This tutorial describes how to use the RADChatRoom library to quickly and easily add a nice-looking, fully functional chat room to your Codename One application.
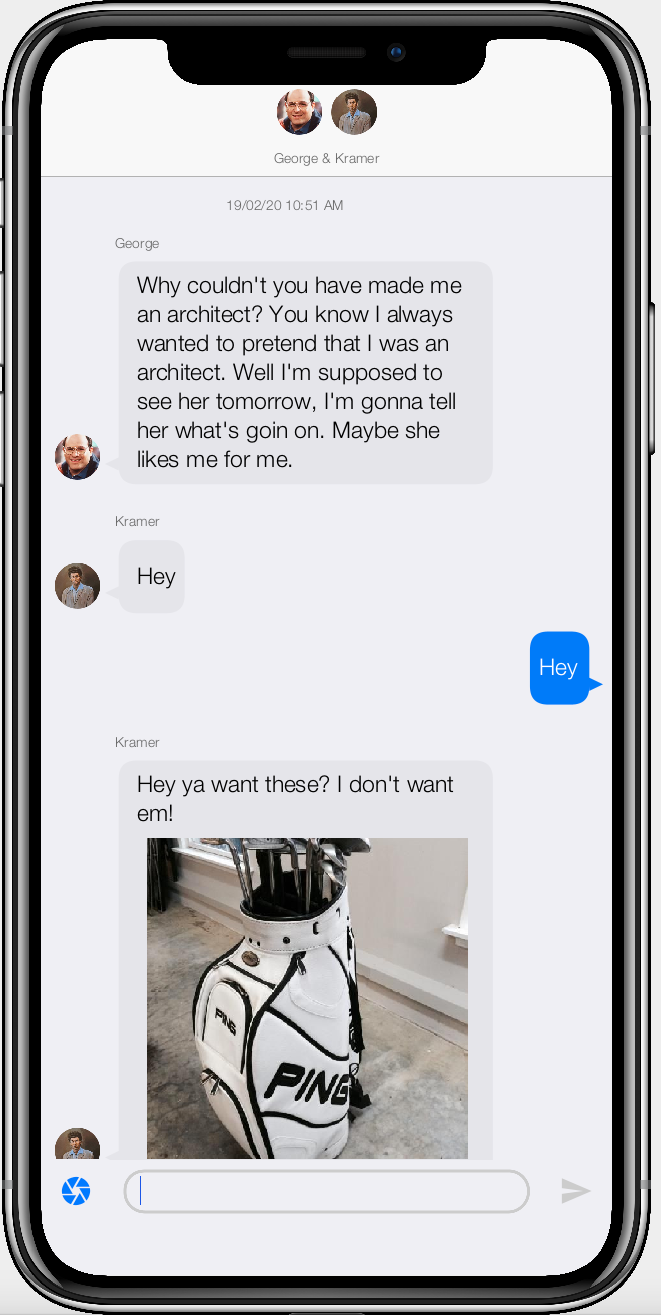
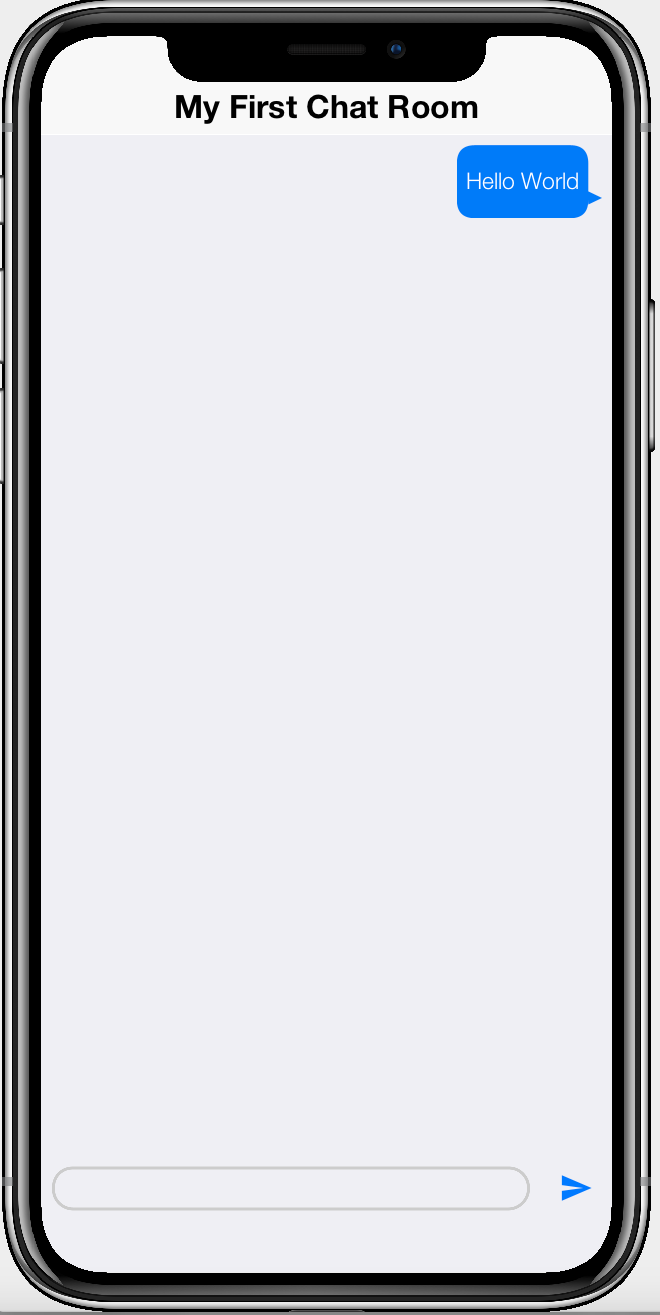
The finished product will look like the following:
You can download the full source of this tutorial’s project here.
You can also try it out yourself here.
| The demo link uses the CodeName One Javascript port, which allows you to deploy Codename One java applications as native Javascript apps inside the browser without any plugins or extensions. When you build a Codename One project for iOS, Android, Desktop, or any of the other build targets, they will be compiled as native apps, with native performance, and will not use Javascript. |
You may also try out an Android build of this project. For other platforms, you can download the sources and build it yourself.
About the ChatRoomView Component
The ChatRoomView component is the first in a new breed of Codename One UI components which go beyond the the fundamental building blocks of user interfaces to provide a rich, fully-functional user experience out of the box. It is built on top of the new CodeRAD library which enables a new level of code-reuse based on the tried-and-true MVC (Model-View-Controller) design pattern. As you’ll see, adding a chat feature to your app is not difficult. All of the minutiae of UI details come working and ready to go. You just need to bind it to your view model and controller.
Prerequisites
In order to create the project in this tutorial, you’ll need the following:
-
IntelliJ, NetBeans, or Eclipse with the Codename One plugin installed.
For information about installing Codename One, see this page.
Project Setup
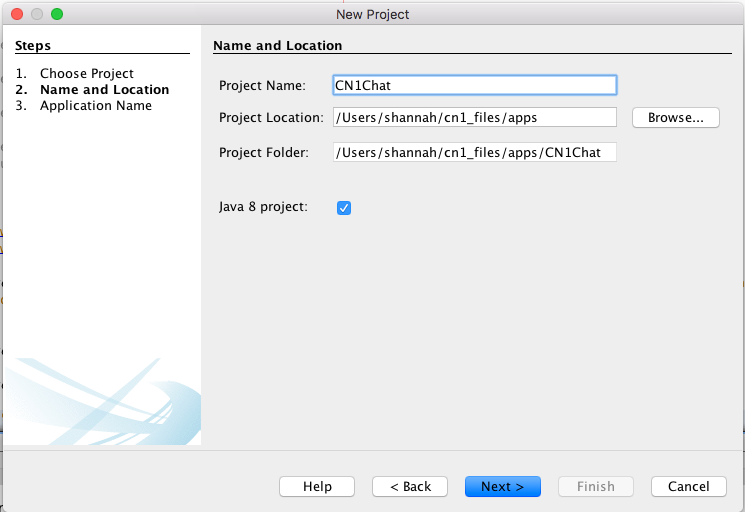
For this tutorial, we’ll create a basic Codename One project, and we’ll add the "CodeRAD" and "RADChatRoom" cn1libs as dependencies. I’ll use NetBeans in this tutorial, but you can use your preferred IDE (IntelliJ or Eclipse).
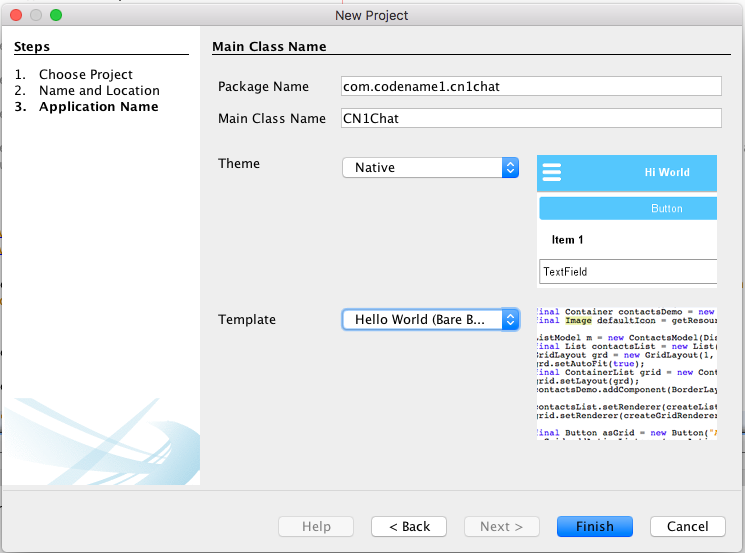
For the sake of this tutorial, I’m going to name the project CN1Chat, and my package will be "com.codename1.cn1chat". I’ll be using the "Hello World" bare-bones project template.
Step 1: Create a New Codename One project
If you haven’t created a Codename One project before, you can refer to this tutorial, which walks you through the creation of your first Codename One project.
Step 2: Activate CSS
The CodeRAD and RADChatRoom libs require CSS to be activated in your project. See this tutorial for the steps on enabling CSS.
Step 3: Add Dependencies
In Codename One settings, add the following cn1libs:
-
CodeRAD
-
RADChatRoom
If you haven’t activated any cn1libs before in your Codename One projects, see this tutorial which explains the process.
Step 4: Create Application Controller
We’ll be using MVC for this app. The CodeRAD cn1lib includes a set of controller classes that help with the structure of such apps. We’ll begin by modifying our app’s main application class (CN1Chat.java) so that it extends ApplicationController, and we’ll replace the class contents with the following:
package com.codename1.cn1chat;


import com.codename1.rad.controllers.ApplicationController;
import com.codename1.rad.controllers.ControllerEvent;

public class CN1Chat extends ApplicationController {
     @Override
    public void actionPerformed(ControllerEvent evt) {
        if (evt instanceof StartEvent) {
            evt.consume();

            // The app has started
        }
    }

}
Step 5: Create A Form Controller
Next we’ll create a controller for the form that will contain the chat. This will create a basic view model, and use it to create a ChatRoomView object, which we will add to the form. The code for the first iteration of this controller is as follows:
package com.codename1.cn1chat;

// imports


public class ChatFormController extends FormController {

    public ChatFormController(Controller parent) {
        super(parent);
        Form f = new Form("My First Chat Room", new BorderLayout());
        ChatRoomView view = new ChatRoomView(createViewModel(), f);
        f.add(CENTER, view);
        setView(f);
    }

    /**
     * Creates a view model for the chat room.
     * @return
     */
    private Entity createViewModel() {
        ChatRoomView.ViewModel room = new ChatRoomView.ViewModel();

        ChatBubbleView.ViewModel message = new ChatBubbleView.ViewModel();
        message.messageText("Hello World");
        room.addMessages(message);
        return room;
    }

}
A couple of things to note with this code:
-
The
createViewModel()method creates a minimal view model for our chat room. It uses theChatRoomView.ViewModelclass for the view model. This class is only a reference implementation of a view model, and theChatRoomViewclass doesn’t require you to use this class at all if you don’t want to. Later on, in this tutorial, I’ll show you how to use your own custom class for the view model. -
Similarly, the
ChatBubbleView.ViewModelis a reference implementation of a view model to encapsulate a message in the chat room, but you can use your own custom classes for these models also.
Step 6: Show the Form
Finally, we need to show the Chat form when the app launches. Modify your Application controller class to create a new instance of ChatFormController() and show its form as follows:
public class CN1Chat extends ApplicationController {
     @Override
    public void actionPerformed(ControllerEvent evt) {
        if (evt instanceof StartEvent) {
            evt.consume();
            new ChatFormController(this).getView().show();
        }
    }
}
Step 7: Run the App
Now that we have the minimal foundation in place, let’s run the app in the simulator. If everything goes well, you should see something like the following.

This looks good, but it’s not a fully functional chat app yet. You’ll notice that it is missing many of the features that are present in the screenshot I shared of the finished project. The finished project included a title component with avatars of the chat participants:
This is absent because we didn’t add any participants to the chat model.
In addition, there is no "Send" button, in this version, so there is no apparent way to send messages in this chat.
We’ll correct both of these omissions, and add some other features over the course of this tutorial.
Adding a "Send" Button
A "Send" button is a pretty important part of any chat application. We’ll add a send button to our app by defining an action in our controller, and passing it to the ChatRoomView as follows. First we’ll define the action in our ChatFormController class:
// We're going to use a lot of static functions from the UI class for creating
// UI elements like actions declaratively, so we'll do a static import here.
import static com.codename1.rad.ui.UI.*;

// ...
public class ChatFormController extends FormController {

    // Define the "SEND" action for the chat room
    public static final ActionNode send = action(icon(FontImage.MATERIAL_SEND));
Then we’ll create a ViewNode to pass to the ChatRoomView constructor. This is can contain properties that the chat room uses to render itself, including which actions it should "embed" and where.
ViewNode viewNode = new ViewNode(
    actions(ChatRoomView.SEND_ACTION, send)
);

ChatRoomView view = new ChatRoomView(createViewModel(), viewNode, f);
If this is the first time you’ve seen a ViewNode definition, this may look a little bit foreign. All this does is register our "send" action with the "ChatRoomView.SEND_ACTION" category so that the chat room view knows to use it as the "send" action in the chat room. The full source of the ChatRoomController class after these changes is as follows:
package com.codename1.cn1chat;

import com.codename1.rad.controllers.Controller;
import com.codename1.rad.controllers.FormController;
import com.codename1.rad.models.Entity;
import com.codename1.rad.nodes.ActionNode;
import com.codename1.rad.nodes.ViewNode;
import com.codename1.rad.ui.chatroom.ChatBubbleView;
import com.codename1.rad.ui.chatroom.ChatRoomView;
import static com.codename1.ui.CN.CENTER;
import com.codename1.ui.FontImage;
import com.codename1.ui.Form;
import com.codename1.ui.layouts.BorderLayout;

// We're going to use a lot of static functions from the UI class for creating
// UI elements like actions declaratively, so we'll do a static import here.
import static com.codename1.rad.ui.UI.*;


public class ChatFormController extends FormController {

    // Define the "SEND" action for the chat room
    public static final ActionNode send = action(icon(FontImage.MATERIAL_SEND));

    public ChatFormController(Controller parent) {
        super(parent);
        Form f = new Form("My First Chat Room", new BorderLayout());

        // Create a "view node" as a UI descriptor for the chat room.
        // This allows us to customize and extend the chat room.
        ViewNode viewNode = new ViewNode(
            actions(ChatRoomView.SEND_ACTION, send)
        );

        // Add the viewNode as the 2nd parameter
        ChatRoomView view = new ChatRoomView(createViewModel(), viewNode, f);
        f.add(CENTER, view);
        setView(f);


    }

    /**
     * Creates a view model for the chat room.
     * @return
     */
    private Entity createViewModel() {
        ChatRoomView.ViewModel room = new ChatRoomView.ViewModel();

        ChatBubbleView.ViewModel message = new ChatBubbleView.ViewModel();
        message.messageText("Hello World");
        room.addMessages(message);
        return room;
    }

}
Now, let’s run the app in the simulator again.
Notice that a "send" button has been added to the bototm-right of the form, next to the text entry box.

This is progress, but you may be disappointed, upon playing with the send button, to discover that it doesn’t do anything. In fact, when you click the "send" button, the view is sending an event to our controller. We just haven’t implemented a handler for it.
Let’s do that now.
Handling the "Send" Action Event
To handle the "send" event, we simply add the following inside the constructor of our form controller:
addActionListener(send, evt->{
    evt.consume();
    ChatRoomView.ViewModel room = (ChatRoomView.ViewModel)evt.getEntity();
    String textFieldContents = room.getInputBuffer();
    if (textFieldContents != null && !textFieldContents.isEmpty()) {
        ChatBubbleView.ViewModel message = new ChatBubbleView.ViewModel();
        message.messageText(textFieldContents);
        message.date(new Date());
        message.isOwn(true); // Indicates that this is sent by "this" user
                            // so bubble is on right side of room view.

        // Now add the message
        room.addMessages(message);

        // Clear the text field contents
        room.inputBuffer("");
    }

});
This listener will be called whenever the "send" action is fired. On mobile devices this will only occur when the user presses the "Send" button. But on desktop, it will also be fired when the user hits "Enter" while the text field is focused.
The event passed to this handler is an instance of ActionEventNode which includes all of the contextual information necessary to identify the source of the action, including the entity (the room), the UI component (the ChatRoomView) object, and the action (send), that triggered the event.
The logic in this handler should be pretty straight forward. It checks if the "input buffer" contains any text. Since the input buffer is bound to the text field, this is just checks if the text field contains any text. It then creates a new message with the input buffer contents, and clears the contents of the input buffer.
All of these property changes will fire PropertyChangeEvents to the view so that the view state will be updated automatically and instantly.
If you run the app in the simulator again, you should be able to enter text into the text field, and press send, to see a new chat bubble animated into place.
Bonus Points: Disable Send Button When Input Empty
In out action handler, we include logic to prevent sending empty messages. But it would be nice if we game the user a cue in the user interface that "send" doesn’t work when the field is empty. We can do this using the enabledCondition attribute in our action definition:
public static final ActionNode send = action(
    enabledCondition(entity-> {
        return !entity.isEmpty(ChatRoom.inputBuffer);
    }),
    icon(FontImage.MATERIAL_SEND)
);
This says that the send action should only be enabled when the "entity" is non-empty. The "entity" in this case is the view model for the chat room.
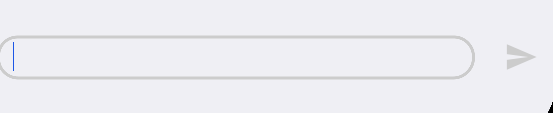
Start the app again in the simulator and notice that the "send" button toggles between enabled and disabled depending on whether there is text in the input field.

Adding Text Messages from Other Users
Our current example only includes messages that the current user posted themself. I.e. We only have chat bubbles on the right-hand side of the view. Let’s add some more sample data to our view model to give us a feel for how a real chat will look. In the ChatFormController class, we’ll change the createViewModel() method as follows:
// Create a view model for the chat room
private Entity createViewModel() {
ChatRoomView.ViewModel room = new ChatRoomView.ViewModel();
// Make up some dummy times for the chat messages.
long SECOND = 1000l;
long MINUTE = SECOND * 60;
long HOUR = MINUTE * 60;
long DAY = HOUR * 24;
// Make first message 2 days ago.
long t = System.currentTimeMillis() - 2 * DAY;
// Some thumbnails for the avatars of the participants
String georgeThumb = "https://weblite.ca/cn1tests/radchat/george.jpg";
String kramerThumb = "https://weblite.ca/cn1tests/radchat/kramer.jpg";
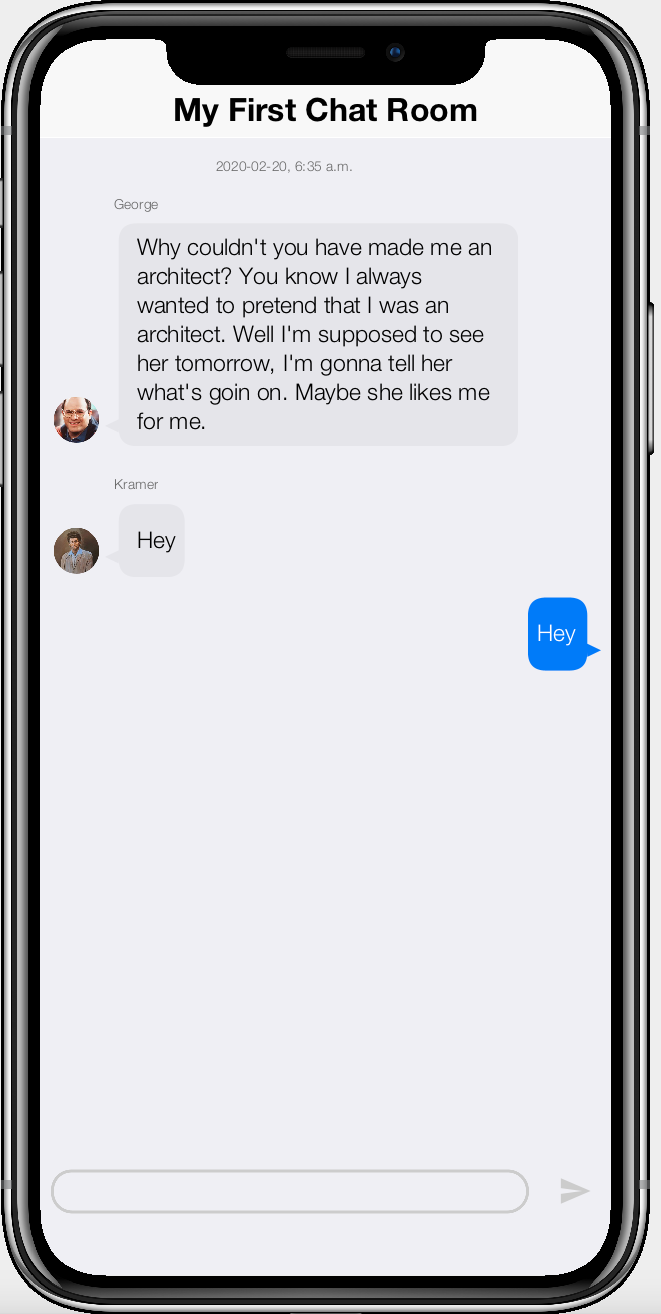
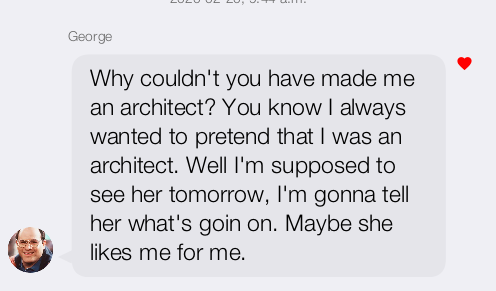
room.addMessages(createDemoMessage("Why couldn't you have made me an architect? You know I always wanted to pretend that I was an architect. "
+ "Well I'm supposed to see her tomorrow, I'm gonna tell her what's goin on. Maybe she likes me for me.",
new Date(t), "George", georgeThumb));
t += HOUR;
room.addMessages(createDemoMessage("Hey", new Date(t), "Kramer", kramerThumb));
t += MINUTE;
room.addMessages(createDemoMessage("Hey", new Date(t), null, null));
return room;
}
// Create a single demo message
private Entity createDemoMessage(String text,
Date datePosted,
String participant,
String iconUrl) {
ChatBubbleView.ViewModel msg = new ChatBubbleView.ViewModel();
msg.messageText(text)
.date(datePosted)
.iconUrl(iconUrl)
.isOwn(participant == null);
if (participant != null) {
msg.postedBy(participant);
}
return msg;
}To make things easier to read, I’ve broken out the code for creating a message into a separate method so we can call create new messages more easily. I’ve created a couple of pretend users, "George" and "Kramer", and I’ve provided some thumbnail URLs for them, which can be used as avatars in the chat room.
And the result:
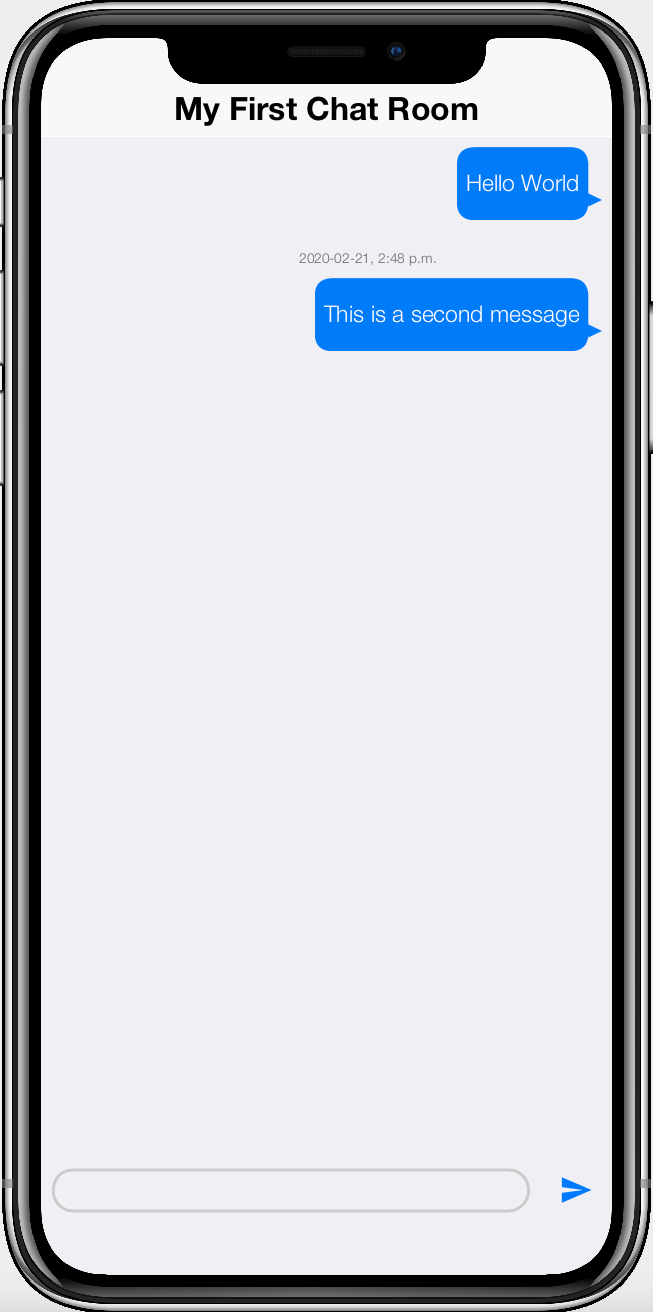
Notice that it shows the time of the first chat message, but not the others. This is intentional. The chat room will only show the time of messages if there is a long delay between it and the previous message. You can see the time of each message by swiping to the left:

Adding the "Participants" Title Component
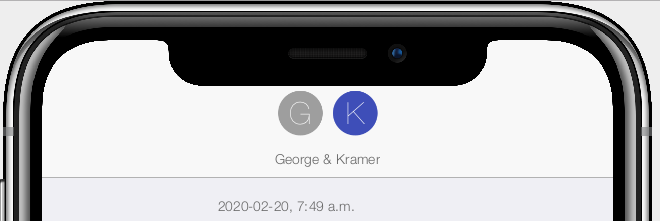
Recall the screenshot of the finished app, in which the form title included a list of participants in the chat room with their avatars.

Let’s add this now by adding some participants to the view model. The ChatRoomView.ViewModel includes methods to directly add participants to the model via addParticpant(Entity… participants). Each participant entity should implement the Thing.name or Thing.thumbnailUrl tags, or both. If Only Thing.name is provided, then it will generate an avatar with the first letter of their name. If Thing.thumbnailUrl is provided, then it will use the image at this url as the avatar.
Let’s begin by creating a custom entity/view model named "ChatAccount" which will be used as participants in the chat. Create a new Java class named "ChatAccount" with the following contents:
package com.codename1.cn1chat;
import com.codename1.rad.models.Entity;
import com.codename1.rad.models.EntityType;
import static com.codename1.rad.models.EntityType.tags;
import com.codename1.rad.models.StringProperty;
import com.codename1.rad.schemas.Thing;

/**
 * View model for an account profile.
 * @author shannah
 */
public class ChatAccount extends Entity {

    // The name property
    public static StringProperty name; (1)

    private static final EntityType TYPE = new EntityType() {{ (2)
        name = string(tags(Thing.name)); (3)
    }};
    {
        setEntityType(TYPE); (4)
    }

    public ChatAccount(String nm) {
        set(name, nm);
    }

}| 1 | The "name" property of our entity. |
| 2 | Define an entity type for the ChatAccount entity. The entity type defines which properties are supported by the ChatAccount entity. |
| 3 | Generating the "name" property as a string property. Notice that we assign the Thing.name tag to this property, which will allow views to bind to it. |
| 4 | Set the entity type inside the "instance" initializer so that all ChatAccount objects have the same entity type. This could have been placed inside the constructor, but placing it simply inside the initializer (i.e. inside {..}) makes for a little less typing, and also helps to signify the declarative nature of this call. |
I’ve added some notes about the key lines of the code listing above which should help to get you up to speed if this is your first custom entity. This entity defines a single property, "name". If we were to define this entity as a POJO (Plain-Old Java object), the class might look something like:
ChatAccount entity would look like if implemented as a POJO (Plain old java object).public class ChatAccount {
private String name;
public ChatAccount(String name) {
this.name = name;
}
}So why not use a POJO for our entity?
The Entity class, together with EntityType provide lots of useful features such as bindable properties, property change events, data conversion, observability, and reflection. All of these features are necessary to enable the creation of loosely coupled components with clean separation between models, views, and controllers. As you’ll see, this loose coupling greatly enhances our ability to produce complex, reusable components, which results in better apps with less code.
Sidebar: Getting and Setting Properties on Entities
Before proceeding, its worth discussing the basics of how to use entities. The Entity class allows us to get and set properties without needing to define getter and setter methods. It also includes a rich set of convenience methods for handling data-conversion. Finally, one of the most powerful features of entities is its loose coupling. It is possible to get and set property values without any knowledge of which properties exist in the entity, via tags.
First things first: Getting and setting property values.
-
Getting and setting property values using a direct property reference.
ChatAccount account = new ChatAccount("George");
String name = account.get(ChatAccount.name);  // "George"
account.set(ChatAccount.name, "Kramer");
name = account.get(ChatAccount.name);  // "Kramer"
This code is tightly coupled to the ChatAccount entity because it directly references the ChatAccount.name property. In some cases, this tight coupling is fine. In other cases, such as when you want to develop a reusable component that requires a "name" property, you may prefer to use "loose" coupling, as follows:
Entity account = ...;  // Could be any entity, but happens to be a ChatAccount
account.setText(Thing.name, "George");
String name = account.getText(Thing.name); // "George"
The CodeRAD library includes a hierarchy of schemas which define tags that may be used to tag entity properties. These schemas were adapted from https://schema.org, which defines entities and properties for a large number of common object types. All schemas extend the base schema, Thing. Some common tags include name, identifier, and thumbnailUrl. When creating reusable components, you can use these schema "tags" to access property values of view models in loosely coupled way. The javadocs for View components should list the tags that it expects on its view models, so you can tag the properties on your entities accordingly.
For a full list of schemas, check out https://schema.org/docs/full.html. Only a subset has been ported into the CodeRAD library. More will be added over time, and you may contribute your own with a pull request.
|
Finally… Adding the Participants
After a lengthy discussion of Entities, Entity types, Tags, and Properties, we can now go ahead and add some participants to the chat room. Add the following inside our createViewModel() method of the ChatFormController class:
room.addParticipants(new ChatAccount("George"), new ChatAccount("Kramer"));This adds two profiles to the chat room as participants. Now, if we launch the app we’ll see the form title replaced with the following avatars.
Now, let’s go a step further and add a "thumbnail url" property to our ChatAccount entity.
thumbnailUrl property to the ChatAccount entitypackage com.codename1.cn1chat;
import com.codename1.rad.models.Entity;
import com.codename1.rad.models.EntityType;
import static com.codename1.rad.models.EntityType.tags;
import com.codename1.rad.models.StringProperty;
import com.codename1.rad.schemas.Thing;
/**
* View model for an account profile.
* @author shannah
*/
public class ChatAccount extends Entity {
// The name property
public static StringProperty name, thumbnailUrl;
private static final EntityType TYPE = new EntityType() {{
name = string(tags(Thing.name));
thumbnailUrl = string(tags(Thing.thumbnailUrl));
}};
{
setEntityType(TYPE);
}
public ChatAccount(String nm, String thumb) {
set(name, nm);
set(thumbnailUrl, thumb);
}
}And modify our ChatFormController to set the thumbnail URL on our entity.
room.addParticipants(
    new ChatAccount("George", georgeThumb),
    new ChatAccount("Kramer", kramerThumb)
);
And reload…

Adding More Actions
So far we’ve implemented the basic requirements of a chat room. It can display messages, show particpants, and it allows users to send new messages. Now let’s go a step further and add some more actions. CodeRAD views like ChatRoomView allow for customization in a variety of ways, but the two primary methods are:
-
Actions
-
View properties
We’ve already used one action to implement the "send" function. As a reminder, we defined the action in our controller, then we passed it as an attribute to the ViewNode when creating the view:
public static final ActionNode send = action( (1)
    enabledCondition(entity-> {
        return !entity.isEmpty(ChatRoom.inputBuffer);
    }),
    icon(FontImage.MATERIAL_SEND)
);
....
ViewNode viewNode = new ViewNode(
    actions(ChatRoomView.SEND_ACTION, send) (2)
);
....
ChatRoomView view = new ChatRoomView(createViewModel(), viewNode, f); (3)| 1 | Defining the "send" action. |
| 2 | Adding the "send" action to the view node, under the ChatRoomView.SEND_ACTION category. The category is a hint to the view about where and how the action should be incorporated into the View. |
| 3 | Creating new ChatRoomView, passing our ViewNode as a parameter |
A ViewNode is a user interface descriptor that can be used to customize the behaviour of a View. It provides a declarative way to define complex user interfaces in a simple way. For the purpose of this tutorial, we will only use the node as a means to pass actions to the ChatRoomView.
|
The "Send" action was added to the ChatRoomView.SEND_ACTION category, but the ChatRoomView also supports some other categories:
-
ChatBubbleView.CHAT_BUBBLE_CLICKED- An action that will be "fired" when the user clicks a chat bubble. -
ChatBubbleView.CHAT_BUBBLE_LONG_PRESS- An action that will be "fired" when the user long presses a chat bubble. -
ChatBubbleView.CHAT_BUBBLE_CLICKED_MENU- Actions that will be displayed in a popup-menu when the user clicks on a chat bubble. This category many include more than one action, and all of supplied actions will be included as menu items in the menu. -
ChatBubbleView.CHAT_BUBBLE_CLICKED_MENU- Actions that will be displayed in a popup-menu when the user long presses on a chat bubble. -
ChatBubbleView.CHAT_BUBBLE_LONG_PRESS_MENU- Actions that will be displayed in a popup-menu when the chat bubble is long pressed. -
ChatBubbleView.CHAT_BUBBLE_BADGES- Actions in this category will be rendered as "badge" icons next to the chat bubble. This is useful, for example, for displaying a "Like/Heart" badge on a chat bubble. -
ProfileAvatarView.PROFILE_AVATAR_CLICKED- An action that will be "fired" when the user clicks on one of the profile avatars next to a chat bubble, or in the title component. -
ProfileAvatarView.PROFILE_AVATAR_LONG_PRESS- An action that will be "fired" when the user long presses on one of the profile avatars. -
ProfileAvatarView.PROFILE_AVATAR_CLICKED_MENU- Actions in this category will be rendered in a popup menu when the user clicks on an avatar. -
ProfileAvatarView.PROFILE_AVATAR_LONG_PRESS_MENU- Actions in this category will be rendered in a popup menu when the user long presses on an avatar. -
ChatRoomView.TEXT_ACTIONS- Actions in this category will be rendered as buttons next to the text input field. This is an appropriate place to add "Photo" or "Video" capture capabilities.
Adding Phone and Video Conferencing
To get our feet wet with actions, let’s add some options to initiate a phone-call or video conference with one of the participants. When the user taps on a profile’s avatar, we’ll present the user with a menu to start a call or video conference.
In the ChatFormController, we’ll add a couple of new actions.
public static final ActionNode phone = action(
    icon(FontImage.MATERIAL_PHONE)
);

public static final ActionNode videoConference = action(
    icon(FontImage.MATERIAL_VIDEOCAM)
);

...

ViewNode viewNode = new ViewNode(
    actions(ChatRoomView.SEND_ACTION, send),
    actions(ProfileAvatarView.PROFILE_AVATAR_CLICKED_MENU, phone, videoConference) (1)
);| 1 | We add the phone and videoConference actions to the ViewNode in the ProfileAvatarView.PROFILE_AVATAR_CLICKED_MENU category so that they’ll be rendered in a popup-menu when the user presses on an avatar. |
Now run the app and click on the title component:
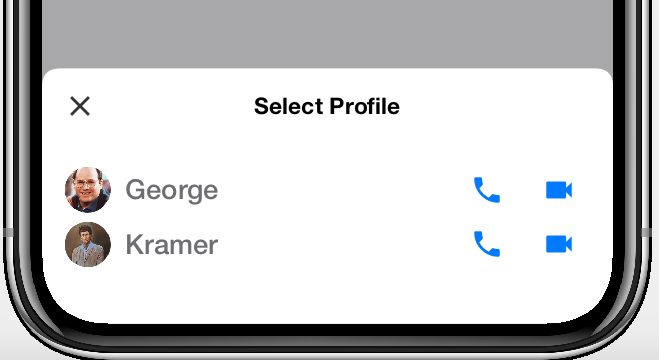
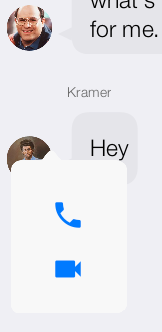
Or tap on an avatar next to one of the chat bubbles:
Currently, clicking on the "phone" or "camera" icon doesn’t do anything because we haven’t defined a handler. Let’s do that now:
addActionListener(phone, evt->{
    evt.consume();
    if (!CN.canDial()) {
        Dialog.show("Not supported", "Phone calls not supported on this device", "OK", null);
        return;
    }
    if (evt.getEntity().isEmpty(Person.telephone)) {
        Dialog.show("No Phone", "This user has no phone number", "OK", null);
        return;
    }

    String phoneNumber = evt.getEntity().getText(Person.telephone);
    CN.dial(phoneNumber);

});
In this handler we first check to see if the platform supports phone calls, and fail with a dialog if it doesn’t. Then we check if the entity in question has a phone number. This code makes use of loose-coupling as we using the Person.telephone tag to check for a phone number rather than a particular property. This will allow this code to work with any entity that has such a property. We also make use of the handy Entity.isEmpty(Tag) method, which will return true if this entity doesn’t have a matching property, or if the entity has the property, but has an "empty" value for it.
If you try the app out and attempt to phone any of the users, you’ll receive this dialog:
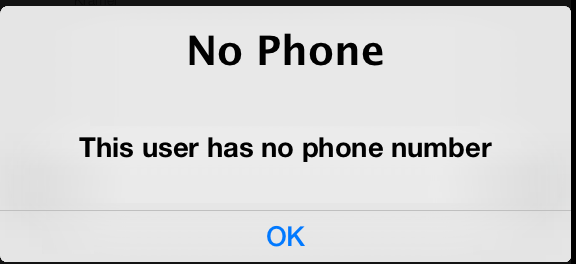
Person.telephone tag, so attempting to phone a user will yield this error dialog.Let’s remedy this situation by adding a property to the ChatAccount entity type.
package com.codename1.cn1chat;
import com.codename1.rad.models.Entity;
import com.codename1.rad.models.EntityType;
import static com.codename1.rad.models.EntityType.tags;
import com.codename1.rad.models.StringProperty;
import com.codename1.rad.schemas.Person;
import com.codename1.rad.schemas.Thing;

/**
 * View model for an account profile.
 * @author shannah
 */
public class ChatAccount extends Entity {

    // The name property
    public static StringProperty name, thumbnailUrl, phone;

    private static final EntityType TYPE = new EntityType() {{
        name = string(tags(Thing.name));
        thumbnailUrl = string(tags(Thing.thumbnailUrl));
        phone = string(tags(Person.telephone)); (1)
    }};
    {
        setEntityType(TYPE);
    }

    public ChatAccount(String nm, String thumb, String phoneNum) {
        set(name, nm);
        set(thumbnailUrl, thumb);
        set(phone, phoneNum);
    }

}| 1 | Creating the phone property as a string property with the Person.telephone tag. |
And we’ll update the code in our ChatFormController that creates our participants to add a phone number.
room.addParticipants(
    new ChatAccount("George", georgeThumb, "712-555-1234"),
    new ChatAccount("Kramer", kramerThumb, null)
);
Let’s start up the app again. There are a few things to notice here:
-
If you press on either George or Kramer’s avatar next to one of their chat bubbles, and try to phone them, they’ll both give you the "This user has no phone number" message. Thats because the avatar that appears next to the chat bubble is actually the ChatMessage.ViewModel entity, and not our ChatAccount entity. The ChatMessage.ViewModel entity doesn’t include a telephone field. The ChatAccount entities are only used to render the title component of the form.
-
If you try to phone Kramer via the title component, you’ll get the same "This user has no phone number" message. This is correct, because we didn’t give Kramer a phone number.
-
If you try to phone George via the title component, it will dial the number that we registered with the George account. (If you’re running in the simulator, it won’t dial… it will just display a message in the console indicating that it is dialing the number).
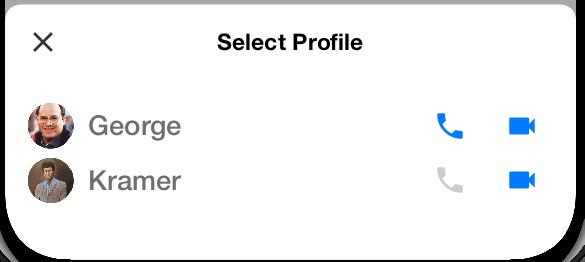
This is progress, but why don’t we save the user the agony of having to click "phone" to find out if the app can actually make a phone call to that user. We have two options for this, we can either "disable" the phone action conditionally, like we did for the "send" action when the input field is empty. This will still show the phone button in the menu, but it will be greyed out and disabled. Alternatively we could actually remove the phone action in such cases so that it isn’t displayed at all for entities that don’t support it.
Let’s try it both ways:
public static final ActionNode phone = action(
    icon(FontImage.MATERIAL_PHONE),
    enabledCondition(entity->{
        return CN.canDial() && !entity.isEmpty(Person.telephone);
    })
);
Result:
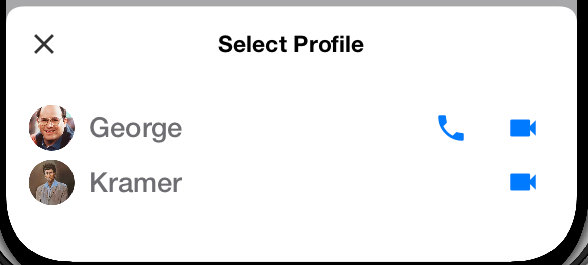
If we want to remove the action from menus where it isn’t supported, then we simply change enabledCondition() to condition().
public static final ActionNode phone = action(
    icon(FontImage.MATERIAL_PHONE),
    condition(entity->{ (1)
        return CN.canDial() && !entity.isEmpty(Person.telephone);
    })
);| 1 | We use the condition(…) attribute instead of enabledCondition(…) to disable/hide the action |
And the result:
Adding a "Like" Badge
Most messaging apps provide a way to "like" a chat message. Let’s add this functionality to our app by using the ChatBubbleView.CHAT_BUBBLE_BADGES category to display the "liked" badge. We’ll use the ChatBubbleView.CHAT_BUBBLE_LONG_PRESS_MENU category to display the toggle button for the user to "like" and "unlike" the message.
public static final ActionNode likedBadge = UI.action(
    UI.uiid("ChatBubbleLikedBadge"), (1)
    icon(FontImage.MATERIAL_FAVORITE),
    condition(entity->{ (2)
        return !entity.isFalsey(ChatMessage.isFavorite); (3)
    })

);

public static final ActionNode likeAction = UI.action(
    icon(FontImage.MATERIAL_FAVORITE_OUTLINE),
    uiid("LikeButton"), (4)
    selected(icon(FontImage.MATERIAL_FAVORITE)), (5)
    selectedCondition(entity->{
        return !entity.isFalsey(ChatMessage.isFavorite); (6)
    })

);

...

ViewNode viewNode = new ViewNode(
    actions(ChatRoomView.SEND_ACTION, send),
    actions(ProfileAvatarView.PROFILE_AVATAR_CLICKED_MENU, phone, videoConference),
    actions(ChatBubbleView.CHAT_BUBBLE_LONG_PRESS_MENU, likeAction), (7)
    actions(ChatBubbleView.CHAT_BUBBLE_BADGES, likedBadge) (8)
);| 1 | We set the UIID of the badge to "ChatBubbleLikedBadge" which is a style defined in the RADChatRoom cn1lib’s stylesheet. It will make the badge small and red. |
| 2 | Use the condition() attribute to ensure that the "liked" badge only shows up if the message has been liked. |
| 3 | We are using the convenience method Entity.isFalsey(Tag) to determine if the chat message has been liked. This returns "true" if the value of this field is anything "falsey", like null, or "", or 0, or false. This allows for flexibility about how the view model wants to store whether the message is a favourite or not. |
| 4 | We define a UIID for the "Like" action so that we can make the button look how we like. |
| 5 | We use the selected(…) attribute on the likeAction to define a different icon for the action when the action is "selected". |
| 6 | We use selectedCondition() on the like action to cause the action to be selected conditionally on whether the message is "liked". This works similar to the condition() and enabledCondition() attributes, except this will affect the selected state of the action’s button. The presence of this attribute causes the button to be rendered as a toggle button instead of a regular button. |
| 7 | We add the like action to the CHAT_BUBBLE_LONG_PRESS_MENU category. |
| 8 | We add the liked action to the CHAT_BUBBLE_BADGES category. |
And, of course, we need to handle the "like" action to toggle the property on and off in the view model.
addActionListener(likeAction, evt->{
    evt.consume(); (1)
    Entity chatMessage = evt.getEntity();
    chatMessage.setBoolean( (2)
            ChatMessage.isFavorite, (3)
            chatMessage.isFalsey(ChatMessage.isFavorite) (4)
    );

});| 1 | We consume the event so that the view knows that we handled it. This prevents any default behaviour from conflicting. |
| 2 | We use the Entity.setBoolean(…) method to signify that we are setting the value as a boolean. This will ensure that the value is converted to the correct type for the underlying property. |
| 3 | We use the ChatMessage.isFavorite tag to target the field for loose coupling. The ChatBubbleView.ViewModel class that we’re using does implement a property with this tag, but we are writing code in such a way that we don’t need to care about which property it is. |
| 4 | Again using isFalsey() to get the current value of the flag, and we toggle it to be opposite. |
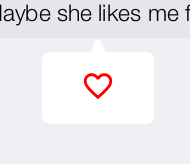
Finally, our "Like" button will be a heart icon. When selected it will be a filled heart icon. When unselected, it will be contour of a heart. We specified a UIID of "LikeButton" for this action in its definition. We just need to add this style to our stylesheet. Open the project’s stylesheet (at css/theme.css) and add the following:
LikeButton {
    background-color:transparent;
    cn1-border-type: none;
    color: red;
}
And the test drive… Open up the app again, long press on a chat message, and click the "Like" action. Then it should display a red heart badge next to the chat bubble.
Adding A Photo Capture Feature
Most messaging applications include the ability to add photos to messages. Let’s add this feature to our chat app now.
First we’ll define a new action called "capturePhoto", and add to the the TEXT_ACTIONS category of our view node.
public static final ActionNode capturePhoto = action(
        icon(FontImage.MATERIAL_CAMERA)
);

...

ViewNode viewNode = new ViewNode(
    actions(ChatRoomView.SEND_ACTION, send),
    actions(ProfileAvatarView.PROFILE_AVATAR_CLICKED_MENU, phone, videoConference),
    actions(ChatBubbleView.CHAT_BUBBLE_LONG_PRESS_MENU, likeAction),
    actions(ChatBubbleView.CHAT_BUBBLE_BADGES, likedBadge),
    actions(ChatRoomView.TEXT_ACTIONS, capturePhoto) (1)
);| 1 | Added capturePhoto action to the TEXT_ACTIONS category so that it will appear as a button beside the text field. |
And we’ll also add a handler for this action, which will capture a photo, and emed the photo in a message that we will add to the chat room’s view model.
addActionListener(capturePhoto, evt->{
    evt.consume();
    String photoPath = Capture.capturePhoto();
    if (photoPath == null) {
        // User canceled the photo capture
        return;
    }


    File photos = new File("photos"); (1)
    photos.mkdirs();
    Entity entity = evt.getEntity();
    File photo = new File(photos, System.currentTimeMillis()+".png");
    try (InputStream input = FileSystemStorage.getInstance().openInputStream(photoPath);
            OutputStream output = FileSystemStorage.getInstance().openOutputStream(photo.getAbsolutePath())) {
        Util.copy(input, output);

        ChatBubbleView.ViewModel message = new ChatBubbleView.ViewModel();
        message.attachmentImageUrl(photo.getAbsolutePath()); (2)
        message.isOwn(true);
        message.date(new Date());
        EntityList messages = entity.getEntityList(ChatRoom.messages); (3)
        if (messages == null) {
            throw new IllegalStateException("This chat room has no messages list set up");
        }
        messages.add(message); (4)

    } catch (IOException ex) {
        Log.e(ex);
        ToastBar.showErrorMessage(ex.getMessage());
    }
});| 1 | We will create a directory named "photos" where we store all of the photos for the app. |
| 2 | Set the path of this photo under attachmentImageUrl. The ChatBubbleView will accept http, https, and file URLs, as well as storage keys. It will render them correctly in the view according to the type of URL it is. |
| 3 | The "entity" of this event is the view model for the ChatRoomView. Here we use the ChatRoom.messages tag to access the messages list in a loosely coupled way. This code will work even if we change the class that we use for the ChatRoomView’s view model. |
| 4 | Adding the message to the messages entity list will trigger a list change event and it will be rendered automatically in the chat room. |
Now, let’s fire the chat up again and take it for a test drive.

capturePhoto action is rendered as a button beside the input text field.You should now be able to click on the "capture photo" button to capture an image. In the simulator, it will open a file dialog to select an image. On device, it will activate the devices camera so that you can take a photo. After capturing an image, it should be added to the chat inside a message bubble as shown below:
Linking to a Back-end Chat Server
In this tutorial we created a mock chat application in order to demostrate the ChatRoomView, which is a user interface component. It did not include any integration with a server so it doesn’t allow you to actually chat with other people. Linking to a server is not difficult, and the MVC architecture of this example should make it very clear how the integration should occur. I’ll leave this integration as an exercise for the reader. As a starting point, I recommend checking out the cn1-websockets library, and its chat demo.
Further Reading
This tutorial provides just a small glimpse into the capabilities of Codename One and the CodeRAD library. To learn more, please see https://www.codenameone.com.