Recipes for using Codename One to develop cross-platform mobile apps in Java and Kotlin.
Themes
The following recipes include tips on customizing the look and feel of Codename one apps using themes, CSS, Styles, etc..
1. Platform-Specific Styling
Problem
You have used CSS to style your app, and it looks great on some devices but not on others. You want to change the font size of some styles, but only on specific devices.
Solution
Use CSS media queries to target styles at a specific device (e.g. desktop, tablet, or phone), platform (e.g. Android, iOS, Mac, Windows, etc…), or device densities (e.g. low, medium, high, very high, etc..).
@media platform-ios {
    Label {
        color: red;
    }
}
Media queries will allow you to target devices based on three axes: Platform, Device, and Density
| Value | Description |
|---|---|
|
Apply only on iOS |
|
Apply only on Android |
|
Apply Only on Mac desktop. |
|
Apply Only on Windows desktop. |
| Value | Description |
|---|---|
|
Apply only desktop |
|
Apply only on tablet |
|
Apply only on phone |
| Value | Description |
|---|---|
|
Very Low Density 176x220 And Smaller |
|
Low Density Up To 240x320 |
|
Medium Density Up To 360x480 |
|
Hi Density Up To 480x854 |
|
Very Hi Density Up To 1440x720 |
|
HD Up To 1920x1080 |
|
Intermediate density for screens that sit somewhere between HD to 2HD |
|
Double the HD level density |
|
4K level density |
You can combine media queries to increase the specificity.
@media platform-and, device-tablet, density-4k {
    Label {
        font-size: 5mm;
    }
}
You can also combine more than one query of the same type to broaden the range of the query: .Example: Targeting only hd, 2hd, and 4k Android tablets
@media platform-and, device-tablet, density-4k, density-2hd, density-hd {
    Label {
        font-size: 5mm;
    }
}
Further Reading
2. Platform-Specific Font Scaling
Problem
Your app looks great except that on desktop, the fonts are a little too small. If you could only scale the fonts to be 25% larger on the desktop, your app would be perfect.
Solution
You can use font-scaling constants to scale all of the fonts in your stylesheet by a constant factor. You can use a "media-query-like" syntax to apply this scaling only on particular platforms, devices, or densities.
#Constants {
    device-desktop-font-scale: "1.25";
}|
Tip
|
In most cases it is better to use standard media queries to apply styles which target specific platforms in a more fine-grained manner. |
Further Reading
Data Processing
The following recipes relate to data processing and conversion. This includes parsing data like JSON, HTML, and XML.
3. Parsing HTML
Problem
You want to parse some HTML content into a data structure. You can’t simply use the XMLParser class because the content is not well-formed XML, but you would like to be able to work with the parsed document using the same tools (e.g. Result and Element.
Solution
Use the HTMLParser class from the CN1HTMLParser cn1lib. It contains a simple API for parsing an HTML string into an Element, the same type of element that XMLParser returns.
Usage example:
HTMLParser parser = new HTMLParser();

Element root = parser.parse(htmlString).get(); (1)
Result r = Result.fromContent(root);

// Now modify the document
// In this example we're going to replace image src with placeholders
// so we can load them separately.
List<Element> images = r.getAsArray("//img");
int index = 0;
List<String> toLoad = new ArrayList<>();
if (images != null) {
    for (Element img : images) {
        String src = img.getAttribute("src");
        if (src.startsWith("http://*/") || (!src.startsWith("http://") && !src.startsWith("data:") && !src.startsWith("https"))) {
            img.setAttribute("id", "nt-image-"+index);
            toLoad.add(src);
            img.setAttribute("src", "");
            index++;
        }
    }
}

// Now write the document as well-formed XML.
XMLWriter writer = new XMLWriter(true);
String pageContent = writer.toXML(root);-
The
parse()method returns an Async promise. If you want to use it synchronously, you can callget(), which will wait until parsing is done.
Alternate Async Usage
The above example uses the get() method to wait until the result is ready, but you can use the parser asynchronously as well:
parser.parse(htmlString).ready(root->{
     // root is the root Element of the document.
});
Discussion
The HTMLParser class wraps an off-screen BrowserComponent to use the platform’s native webview to actually parse the HTML. It then serializes the DOM as XML, which is then re-parsed using the Codename One XML parser. There are pitfalls to this approach, including performance (it takes time to pass data back-and forth between a webview, after all), and possibly different results on different platforms.
|
Note
|
The Codename One core library also includes an HTMLParser class at com.codename1.ui.html.HTMLParser. This parser is meant to be used as part of the deprecated HTMLComponent class, which is a light-weight web view component that used to be used on platforms that didn’t have a native webview, e.g. J2ME. Now all modern platforms have a native webview, so this component isn’t used much. Additionally the HTMLParser class in that package doesn’t support all HTML, and will fail in strange ways if you try to use it headlessly.
|
Further Reading
-
XMLParser Javadocs - Since the output of HTMLParser is the same as XMLParser, you can find some useful examples in the XMLParser javadocs.
.
4. Using the Clipboard
Problem
You want to copy and paste to and from the system clipboard.
Solution
Use the Display.copyToClipboard() and Display.getPasteDataFromClipboard() to copy andn paste to/from the system clipboard respectively.
Display.getInstance().copyToClipboard("Some text to copy");Object pasteData = Display.getInstance().getPasteDataFromClipboard();
Label text = new Label();
if (pasteData instanceof String) {
text.setText((String)pasteData);
} else {
ToastBar.showInfoMessage("Paste data is not text");
}|
Important
|
In the Javascript port we are restricted by the browser’s sandbox. We can’t just access the system clipboard data for security reasons. However, if the user initiates a paste via You can use |
package com.codename1.samples;


import com.codename1.components.ToastBar;
import static com.codename1.ui.CN.*;
import com.codename1.ui.Display;
import com.codename1.ui.Form;
import com.codename1.ui.Dialog;
import com.codename1.ui.Label;
import com.codename1.ui.plaf.UIManager;
import com.codename1.ui.util.Resources;
import com.codename1.io.Log;
import com.codename1.ui.Toolbar;
import java.io.IOException;
import com.codename1.ui.layouts.BoxLayout;
import com.codename1.io.NetworkEvent;
import com.codename1.ui.Button;
import com.codename1.ui.CN;
import com.codename1.ui.TextArea;
import com.codename1.ui.TextField;
import com.codename1.ui.layouts.GridLayout;


public class ClipboardSample {

    private Form current;
    private Resources theme;

    public void init(Object context) {
        // use two network threads instead of one
        updateNetworkThreadCount(2);

        theme = UIManager.initFirstTheme("/theme");

        // Enable Toolbar on all Forms by default
        Toolbar.setGlobalToolbar(true);

        // Pro only feature
        Log.bindCrashProtection(true);

        addNetworkErrorListener(err -> {
            // prevent the event from propagating
            err.consume();
            if(err.getError() != null) {
                Log.e(err.getError());
            }
            Log.sendLogAsync();
            Dialog.show("Connection Error", "There was a networking error in the connection to " + err.getConnectionRequest().getUrl(), "OK", null);
        });
    }

    public void start() {
        if(current != null){
            current.show();
            return;
        }
        Form hi = new Form("Hi World", BoxLayout.y());
        TextField text = new TextField();
        Button copyBtn = new Button("Copy");
        copyBtn.addActionListener(evt->{
            Display.getInstance().copyToClipboard(text.getText());
        });
        Button pasteBtn = new Button("Paste");
        pasteBtn.addActionListener(evt->{
            if ("html5".equalsIgnoreCase(CN.getPlatformName())) {
                // In the browser, we don't have permission, in general, to read from the clipboard
                // but the user can initiate a paste using Ctrl-V or Cmd-V, or Edit > Paste,
                // and the data will be received in the paste listener.
                Dialog.show("Help", "Please key-codes or Edit > Paste to paste content.", "OK", null);
                return;
            }
            handlePaste(text);
        });

        // The paste listener is informed when the user initiates a paste using
        // key-codes or browser menu items (Edit > Paste).  This is currently only
        // used by the Javascript port.
        hi.addPasteListener(evt->{
            handlePaste(text);
        });

        hi.add(text)
                .add(GridLayout.encloseIn(2, copyBtn, pasteBtn));

        hi.show();
    }

    /**
     * Pastes the current clipboard data as text into the given TextArea.
     * @param text The textarea to paste into
     */
    private void handlePaste(TextArea text) {
        Object pasteData = Display.getInstance().getPasteDataFromClipboard();
        if (pasteData instanceof String) {
            text.setText((String)pasteData);
        } else {
            ToastBar.showInfoMessage("Paste data is not text");
        }
    }

    public void stop() {
        current = getCurrentForm();
        if(current instanceof Dialog) {
            ((Dialog)current).dispose();
            current = getCurrentForm();
        }
    }

    public void destroy() {
    }

}
Security
The following recipes relate to application security.
5. Detecting Jailbroken Device
Problem
You want to detect whether the device your app is running on is Jailbroken or rooted.
Solution
While there is no way to know whether the device is rooted with 100% certainty, you can use the CN1JailbreakDetect cn1lib to to make a good guess. This cn1lib acts as a thin wrapper around the RootBeer Android library, and DTTJailbreakDetection iOS library, which employ heuristics to determine whether the device has likely been jailbroken.
Example
package com.codename1.samples;


import com.codename1.ext.jailbreak.JailbreakDetect;
import static com.codename1.ui.CN.*;
import com.codename1.ui.Display;
import com.codename1.ui.Form;
import com.codename1.ui.Dialog;
import com.codename1.ui.Label;
import com.codename1.ui.plaf.UIManager;
import com.codename1.ui.util.Resources;
import com.codename1.io.Log;
import com.codename1.ui.Toolbar;
import java.io.IOException;
import com.codename1.ui.layouts.BoxLayout;
import com.codename1.io.NetworkEvent;
import com.codename1.ui.Button;
import com.codename1.ui.Command;


public class JailbreakDetectionSample {

    private Form current;
    private Resources theme;

    public void init(Object context) {
        // use two network threads instead of one
        updateNetworkThreadCount(2);

        theme = UIManager.initFirstTheme("/theme");

        // Enable Toolbar on all Forms by default
        Toolbar.setGlobalToolbar(true);

        // Pro only feature
        Log.bindCrashProtection(true);

        addNetworkErrorListener(err -> {
            // prevent the event from propagating
            err.consume();
            if(err.getError() != null) {
                Log.e(err.getError());
            }
            Log.sendLogAsync();
            Dialog.show("Connection Error", "There was a networking error in the connection to " + err.getConnectionRequest().getUrl(), "OK", null);
        });
    }

    public void start() {
        if(current != null){
            current.show();
            return;
        }
        Form hi = new Form("Jailbreak Detection", BoxLayout.y());
        Button detect = new Button("Detect Jailbreak");
        detect.addActionListener(evt->{
            if (JailbreakDetect.isJailbreakDetectionSupported()) {
                if (JailbreakDetect.isJailbroken()) {
                    Dialog.show("Jailbroken","This device is jailbroken", new Command("OK") );
                } else {
                    Dialog.show("Not Jailbroken", "Probably not jailbroken.  But can't be 100% sure.", new Command("OK"));
                }
            } else {
                Dialog.show("No Idea", "No support for jailbreak detection on this device.", new Command("OK"));
            }
        });
        hi.add(detect);
        hi.show();
    }

    public void stop() {
        current = getCurrentForm();
        if(current instanceof Dialog) {
            ((Dialog)current).dispose();
            current = getCurrentForm();
        }
    }

    public void destroy() {
    }

}|
Tip
|
This sample is part of the Codename One samples project, and can be run directly from the Codename One SampleRunner. |
Discussion
The CN1JailbreakDetect provides two useful static methods for jailbreak detection:
-
isJailbreakDetectionSupported()- This checks if the jailbreak detection is even supported on this platform. -
isJailBroken()- This checks if the device is jailbroken. If detection is not supported, then this will always returnfalse.
Currently jailbreak detection is only supported on Android and iOS.
|
Important
|
There is NO way to know with 100% certainty whether or not a device has been jailbroken. |
Further Reading
-
RootBeer project (Used on Android)
-
DTTJailbreakDetection project (Used on iOS)
6. Hiding Sensitive Data When Entering Background
Problem
iOS will take a screenshot of your app when it enters the background that it uses for various previews of the app state. You want to hide sensitive data in your app’s UI to prevent this information from leaking out via these screenshots.
Solution
You can use the ios.blockScreenshotsOnEnterBackground=true build hint to prevent iOS from taking screenshots app goes into the background. This will cause the canvas on which the Codename One UI is drawn to be hidden in the didEnterBackground hook and unhidden in the willEnterForeground hook.
|
Warning
|
This will cause your app to appear as a blank white rectangle when the user is browsing through opened apps. 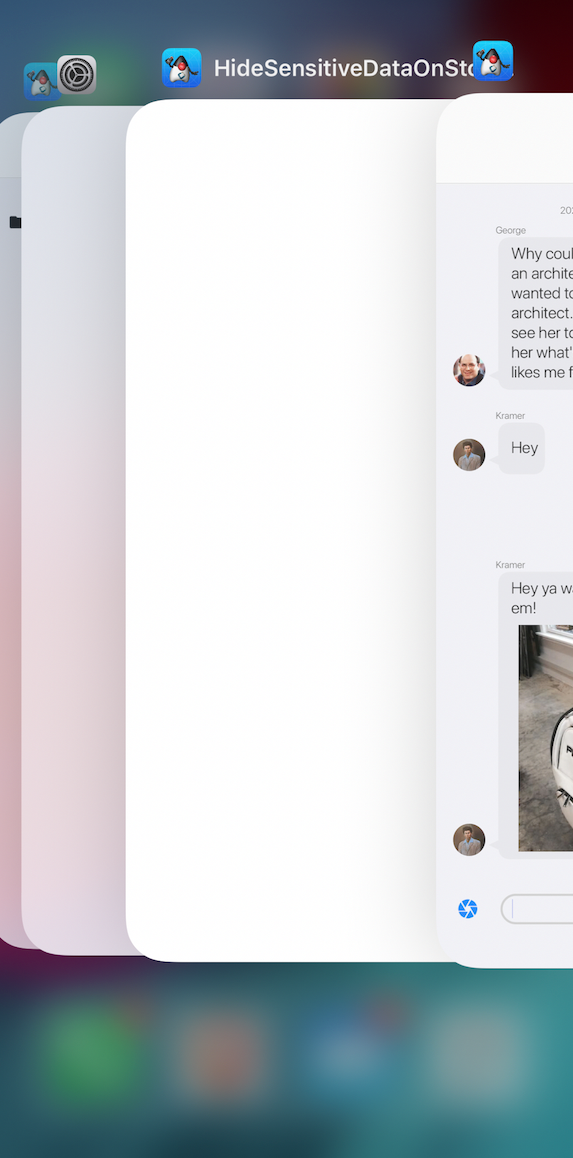
Figure 1. Notice the app in the middle is blank white because it has been set to block iOS screenshots.
|
Discussion
You might have been tempted to try to modify the UI inside the stop() lifecycle method of your app, since it is called itself by the didEnterBackground hook. This strategy will work in some platforms, but not on iOS because the screenshot call is made immediately upon the didEnterBackground method returning - and the stop() method runs on the EDT (a different thread), so this is not possible.
Javascript
The following sections contain tips for working with the Javascript port.
7. Sending Messages to Outside Webpage
Problem
You want to send a message from your Codename One app to the webpage that contains it.
Solution
You can use CN.postMessage(), in Codename One to send the message. The message will be dispatched to Javascript event listeners in the outside webpage that register to receive cn1outbox events.
// The Java side
MessageEvent message = new MessageEvent(
    null,        // event source... we'll leave it null
    "Hello",     // The message to deliver
    0            // Optional message code.
);
//Dispatch the message
CN.postMessage(message);// The javascript side
window.addEventListener('cn1outbox', function(evt) {
var message = evt.detail;
var code = evt.code;
...
});Discussion
The CN.postMessage() method allows you to send a message to the native platform. When deploying as a Javascript app, these messages are converted to custom DOM events and dispatched on the window object. The event name is "cn1outbox", so you can receive events like this from the "javascript" side by registering an event listener for these types of events on the window object.
8. Receiving Messages from the Outside Webpage
Problem
You want to send messages from Javascript (i.e. the page containing the app) to the Codename One app.
Solution
From Javascript, you can dispatch a custom event named 'cn1inbox' on the window object. You can receive these events in Codename One using the CN.addMessageListener() method.
// The javascript side
var message = new CustomEvent('cn1inbox', {detail: 'Hello', code: 0});
window.dispatchEvent(message);// The Java side
CN.addMessageListener(evt->{
String message = evt.getMessage();
int code = evt.getCode();
...
});Discussion
The CN.addMessageListener() and CN.removeMessageListener() methods allow you to register listeners to receive messages from the native platform. When the app is deployed as a Javascript app, the webpage can target these listeners using a custom DOM event named 'cn1inbox'. The Codename One app will receive all events of this type, and dispatch them to the listeners that were registered using CN.addMessageListener().
9. Notify Webpage When App is Started
Problem
You want to notify the outside page when the app is finished loading. If the webpage needs to communicate with the app, it is very helpful to know when the app is ready.
Solution
Register a DOM event listener on the window object for the aftercn1start event.
window.addEventListener('aftercn1start', function(evt) {
   console.log("The Codename One app has started...");
   ...
});
Discussion
Codename One broadcasts its lifecycle events as DOM events so that the webpage can stay synchronized with its status. The following events are currently supported:
| Event | Description |
|---|---|
|
Fired before the |
|
Fired after the |
|
Fired before the |
|
Fired after the |
|
Note
|
Currently The stop() and destroy() lifecycle methods are not used in the Javascript port, as there doesn’t seem to be a logical place to fire them. This may change in the future.
|
In addition to these DOM events, you can also check window.cn1Initialized and window.cn1Started for true to see if the init() and start() methods have already run.
10. Deploying as a "Headless" Javascript App
Problem
You want to deploy your app inside a webpage "headlessly". I.e. You don’t want the user to see the app. This might be useful if you just want to use your app as a javascript library.
Solution
Embed the app inside a 1-pixel iframe.
<!doctype html>
<html>
  <head> ... </head>
  <body>
    <iframe
      id='myapp'
      style='position:fixed; width: 1px; height:1px; border:none; bottom:0'
      src='https://example.com/MyApp/index.html'
    />
    .. Rest of webpage..
  </body>
</html>|
Note
|
By trial and error, we have determined that displaying the iframe with 1px width and height is the best solution. Using display:none causes the browser to not load the iframe at all. Positioning the iframe outside the viewport, causes some APIs to be turned off (e.g. microphone).
|
Discussion
If you are deploying your app as a headless app, then you are likely expecting to be able to communicate between the webpage and your app. You will also need to be notified of lifecycle events in your app so you know when it has finished loading. Be aware of CORS (cross-origin-resource-sharing) browser policies if the page containing the <iframe> is loaded from a different domain than your app.
CORS Checklist
If the app (inside the iframe) is hosted at a different domain than the parent page (the page with the <iframe> tag), then you need to jump through some hoops to get things working.
-
Make sure that you are not sending the X-Frame-Options response header with your app. This header prevents your page from being displayed inside an iframe. Many web hosts add this header automatically.
-
If you want to use features like "camera" and "microphone", you’ll need to add the "allow" attribute to your iframe tag. E.g.
<iframe allow="camera;microphone" …/>. For more information about this attribute, see This article. -
If you need to communicate between the parent window and the iframe document (i.e. the window with your app, you’ll need to use Window.postMessage(). You can access the iframe’s "window" object using
myIframe.contentWindow.
11. Playing Audio in a Headless App
Problem
In some cases Codename One apps may be deployed as "headless" apps. This can be achieved by simply embedding the app inside an iframe and positioning the iframe outside the main view port (e.g. x=-1000, y=-1000). If you are deploying the app this way, you may run into cases where the app requires user interaction. For example, if you try to play audio in the app, and you are running on iOS, then the app may require some user interaction in order for Safari to allow the audio. Codename One apps deal with this situation by prompting the user to play the audio. However, if the app is off screen, the user won’t see this prompt, so the audio will just not play.
|
Note
|
The user will only be prompted for the first audio clip that the app tries to play. Subsequent clips can be played unimpeded. |
Solution
Codename One broadcasts a custom DOM event named "cn1userprompt" when a prompt is displayed that the user needs to interact with. You can register an event listener in the outside webpage to listen for this event, and display the iframe in such cases.
The "cn1userpromptresponse" custom DOM event will be dispatched after the user has finished the interaction.
myIframe.contentWindow.addEventListener('cn1userprompt', function(evt) {
    // The app requires user interaction..  display the iframe
});

myIframe.contentWindow.addEventListener('cn1userpromptresponse', function(evt) {
    // The user has finished their interaction... you can hide the iframe
});
12. Displaying Custom Prompt to Play Audio
Background
On some browsers (e.g. Safari), your app can only play audio as a direct response to user interaction. E.g. The user needs to actually click on the screen to initiate audio play. This is only required for the first audio clip that your app plays. If the app is ever denied permission to play an audio clip by the browser, it will display a prompt to the user saying "Audio Ready", with a "Play Now" button. When the user presses that button, the audio will begin to play.
Problem
You want to customize the dialog prompt that is displayed to ask the user for permission to play audio.
Solution
Register a message listener using CN.addMessageListener(), and call isPromptForAudioPlayer() on the received MessageEvent object to see if it is a prompt to play audio. If isPromptForAudioPlayer() returns true, then you can consume() the event to signal that you’ll be displaying a custom dialog, and then you can display your own dialog as shown in the example below. When the user has accepted or rejected the permission prompt, you must call the complete() method on the promise that you obtain using the getPromptPromise() method. complete(true) indicates that the user decided to play the audio. complete(false) indicates that the user decided not to play the audio.
E.g.
CN.addMessageListener(evt->{
    if (evt.isPromptForAudioPlayer()) { (1)
        System.out.println("Received a prompt for the audio player... audio is ready");
        // This is a prompt that is shown when there is audio ready to play
        // but the user needs to interact.  This is javascript-only to get around
        // restrictions that only allow audio in direct response to user interaction

        // We should display some kind of UI to let the user know that the audio is ready
        // and they need to press a button to play it.
        evt.consume(); (2)
        CN.callSerially(()-> { (3)
            MessageEvent.PromptPromise res = evt.getPromptPromise(); (4)
            if (Dialog.show("Audio Ready", "The audio is ready.", "Play", "Cancel")) {
                res.complete(true); (5)
            } else {
                res.complete(false); (6)
            }
            return;
        });
        return;

    }
});-
isPromptForAudioPlayer()tells us that this event is a prompt to play audio. -
Important You must call
evt.consume()to let Codename One that you are going to handle this prompt. Otherwise, the default permission prompt will still be shown. -
Because we are using a modal dialog which will block the event dispatch, we wrap the dialog in
callSerially()so this event dispatch won’t be blocked. This is not absolutely necessary, but it will make it easier to follow the app’s logic, as these prompts are designed to by asynchronous. -
Obtain the
PromptPromisefrom the event which we will use to convey the user’s response back to the app. YOU MUST call thecomplete()on this promise no matter what, or the app will lock up. -
If the user elected to "Play" the audio, then call
res.complete(true)on the promise. -
If the user elected not to play the audio, then call
res.complete(false)on the promise.
|
Tip
|
You can also use the isPromptForAudioRecorder() method to detect a request for the audio recorder prompt.
|
Discussion
In this example we used a modal dialog to prompt the user, but you can use any UI mechanism you like for prompting the user. A Sheet, an interaction dialog, or a separate Form. You just need to remember to call complete() on the promise after the user has made their choice. If you forget to call complete() it could lock up the app.
|
Important
|
Calling complete(true) directly without actually displaying a dialog to the user won’t work. It is the "click" that satisfies the browsers "media engagement index" restrictions so that it will allow the app to play audio. The user can click anywhere in the app; but they need to click. If you call complete(true) without the user clicking, then the app will try to play the audio and just fail.
|