The Kotlin App Template is a maven starter project for building a cross-platform, native mobile app in Kotlin, using Codename One.
|
Tip
|
This project uses Kotlin as the main app programming language. If you would prefer to use Java, check out the Bare-bones Java App template. |
Features of this project
- Kotlin
-
It includes a basic "Hello World" application stub written in Kotlin. See the
common/src/main/kotlindirectory for kotlin sources - CSS
-
Uses CSS to customize the theme. See the
common/src/main/cssdirectory for CSS sources. - Cross-platform
-
It includes Maven goals for building native apps for iOS, Android, Mac, Windows, Javascript, and as a cross-platform JavaSE desktop app.
- Maven
-
As mentioned above, this is a Maven starter project. This means that it uses maven to manage all dependencies and for building the project.
- IDE Integration
-
The project includes IntelliJ and NetBeans configuration to expose the important goals as convenient menus. For tighter integration, you can also install the Codename One plugin in your IDE. See Getting Started with Codename One for instructions.
Scope of this Tutorial
This tutorial describes how to:
-
Build the project for your desired platform. A variety of build targets are supported, including iOS, Android, Mac, Windows, Javascript, and as a JavaSE Desktop app.
-
Opening the project in your IDE (IntelliJ, NetBeans, Eclipse, etc…).
For more in-depth documentation on Codename One, please visit the Codename One website.
Prerequisites
To run and build the project, you should be running a modern version of Mac OS, Windows, or Linux with JDK 8 or higher installed.
Installing OpenJDK
There are many distributions of OpenJDK available. Some of the more popular ones include:
You will find download links for many versions of the JDK on the above websites. This tutorial was written using JDK 11.
|
Tip
|
This project includes a Maven wrapper script that will automatically install Maven if you don’t have it installed already. |
Generating a New Project from this Template
-
Go to https://start.codenameone.com/ and select "Bare-bones Kotlin App" from the "Template" menu:
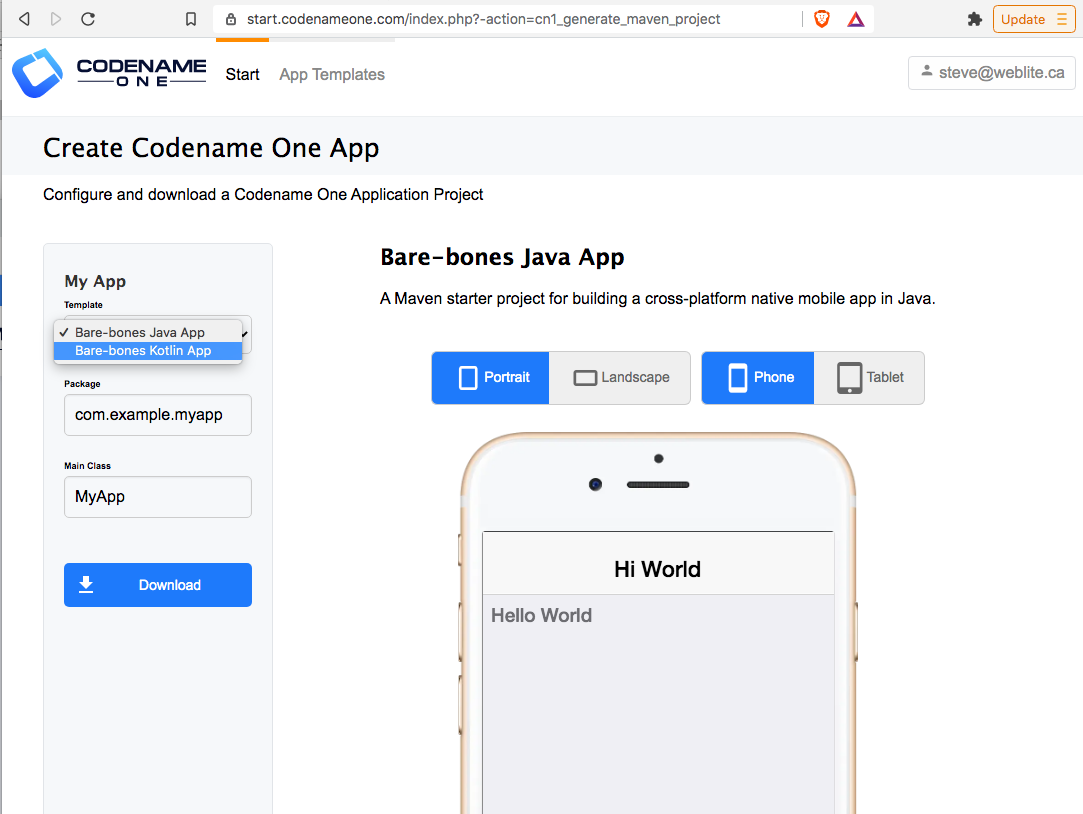
-
Enter a "Package" and "Main Class" for your app. The package will be used both for your App ID, when you submit your app to the app stores, and for your maven project’s
groupID. The "Main Class" is the name of the "main" Kotlin class for your app. -
Press "Download"
This will prompt you to save the project as a .zip file.
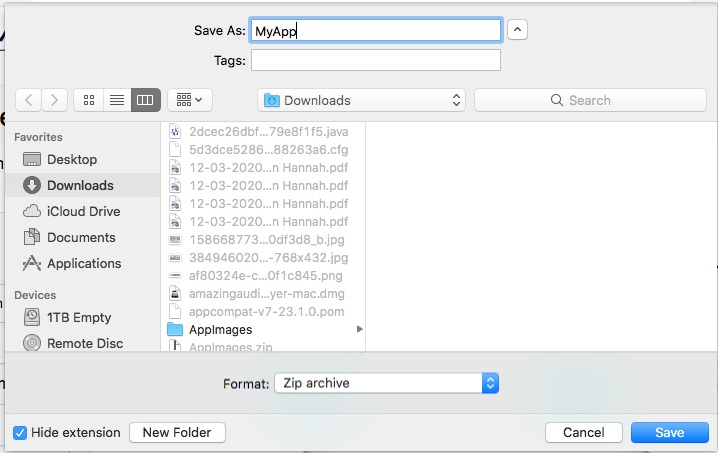
Select where you want the project saved, and press "Save".
After the download completes, you should extract the zip file.
Running the Project in the Codename One Simulator
You can run the project directly from the command-line or you can open the project in your preferred IDE (e.g. IntelliJ or NetBeans) and run the project there.
Running the project from the Command Line
The project comes bundled with run.sh and run.bat scripts that will allow you to run the project from the command line. If you are on Windows, you should use the run.bat script. If you are on Linux or Mac, you should use the run.sh script.
cd MyApp
./run.shcd MyApp
run.bat|
Tip
|
The |
If all goes well, the Codename One Simulator should open up, and you should see the app.
See The First Run in the Simulator for the expected result.
Running the Project in IntelliJ IDEA
IntelliJ can open this project and work with it natively without requiring any special plugins. This is because IntelliJ supports Maven projects natively, and this is a Maven project.
To run this project in IntelliJ IDEA, start by opening the project in IntelliJ.
|
Tip
|
There are many ways to do this and the specifics may depend on your operating system. E.g. On Mac, I can open a project directly from the Terminal by running I can alternatively drag the "MyApp" directory onto the "IntelliJ IDEA" application icon in the Finder. Alternatively, I can open IntelliJ, and select |
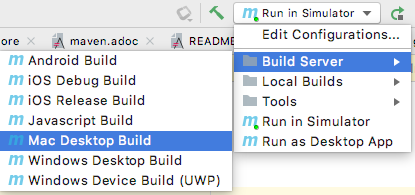
Once the project is open, you should see the Configuration menu in the upper right on the toolbar with the option "Run in Simulator" already selected as shown below:

|
Tip
|
If you don’t see "Run in Simulator" selected in the configuration menu, click on the menu and select it from the options listed as shown below: 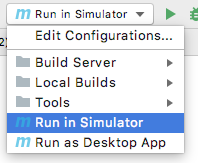
|
Press the green ![]() icon to run the app in the simulator.
icon to run the app in the simulator.
See The First Run in the Simulator for the expected result.
Running the Project in NetBeans
|
Important
|
Before opening the project in NetBeans, you need to copy the contents of the tools/netbeans directory into the root project directory. These files are required by NetBeans to build, run, and debug the project correctly. |
NetBeans supports Maven projects natively. You can open the project directly in NetBeans using it’s File > Open Project… option.
After the project is open, you can run the app by pressing the green "run" icon (
![]() ).
).
Running the Project in Eclipse
First, we must import the project into Eclipse using File > Import…
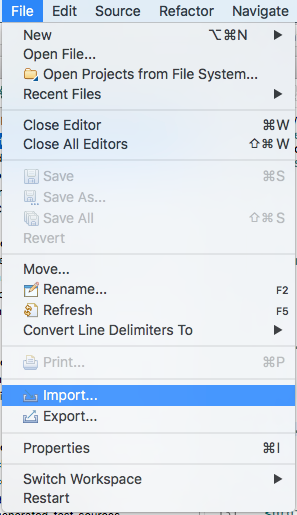
In the Import dialog, select Maven > Existing Maven Projects
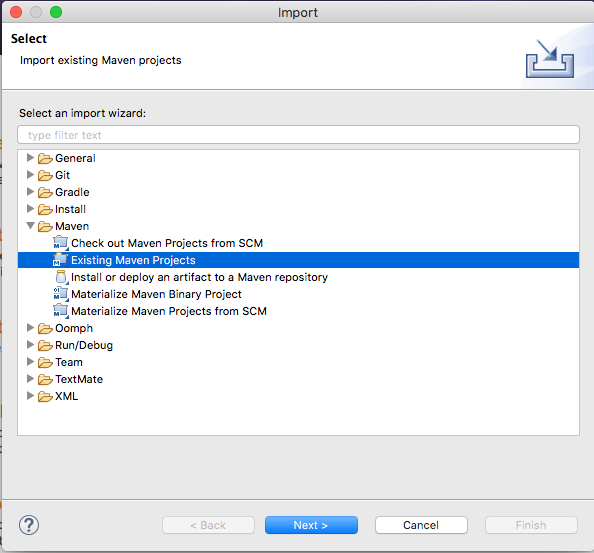
And press Next.
In this panel, select (check the boxes beside) all of the projects, and press Finish
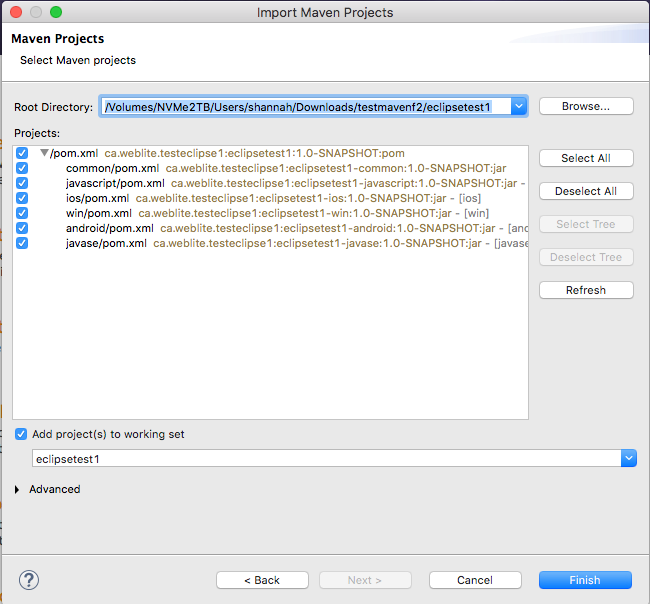
|
Note
|
This may present a dialog saying that there were errors. Ignore these for now as it is just a case of Eclipse not understanding the relationships between all the modules yet. |
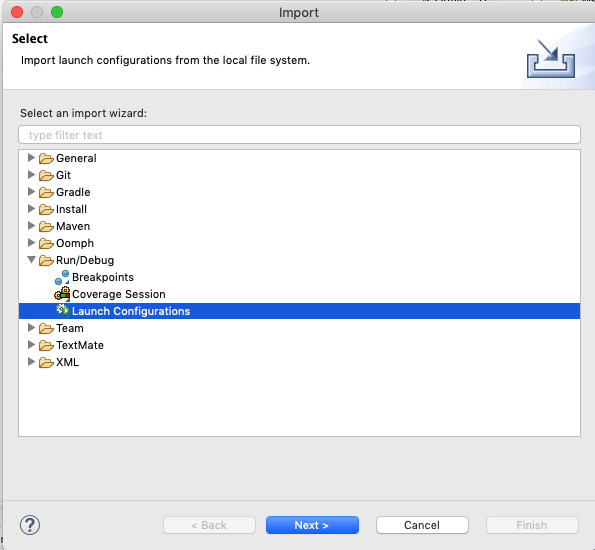
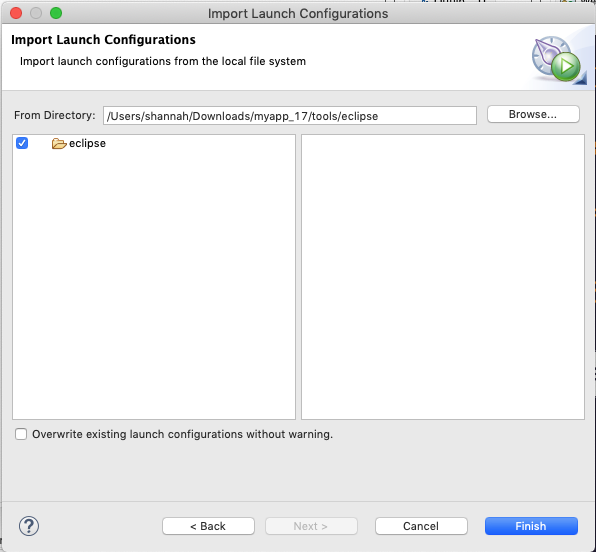
Next we need to import the Eclipse launch configurations located inside the tools/eclipse directory.
Select File > Import… again, but this time, in the Import dialog, select Run/Debug > Launch Configurations and click Next.
In the next panel, press Browse… then select the tools/eclipse directory.
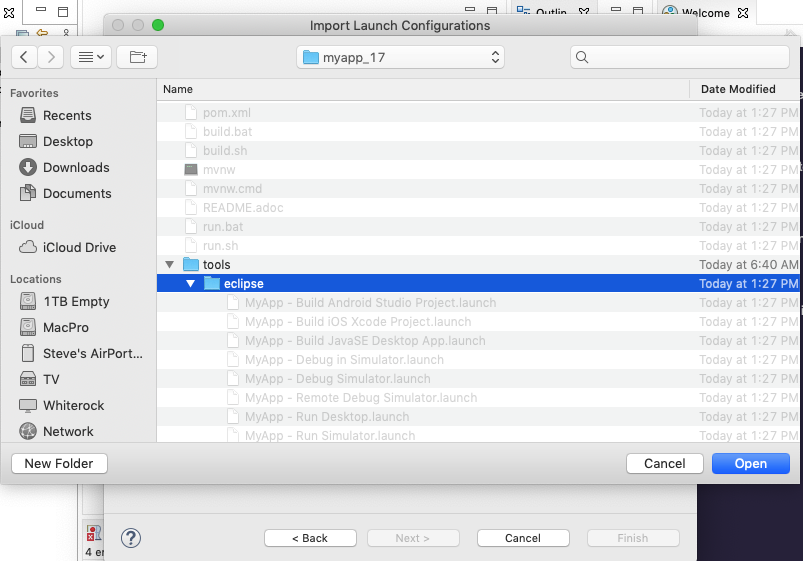
Then check the eclipse option, and press Finish
When the project opens, show the Package explorer, and you should see a set of projects like the following:
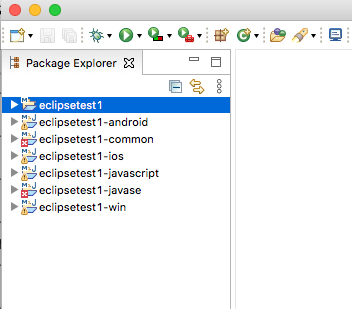
Select the first package in the list (in the screenshot it says "eclipsetest1", but for your project it will be the name that you chose for your project).
Then click the down arrow beside the Run button on the toolbar. (
 )
)
This should expand to show a menu of all of the build options you have, as shown below:
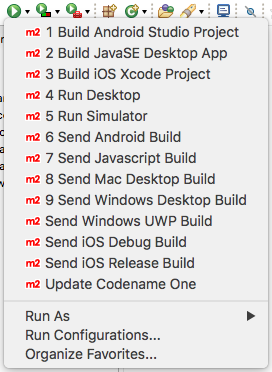
Select the "Run Simulator" option.
The First Run in the Simulator
If you run this project in the Codename One Simulator without making any modifications to the app, it will look something like the following.
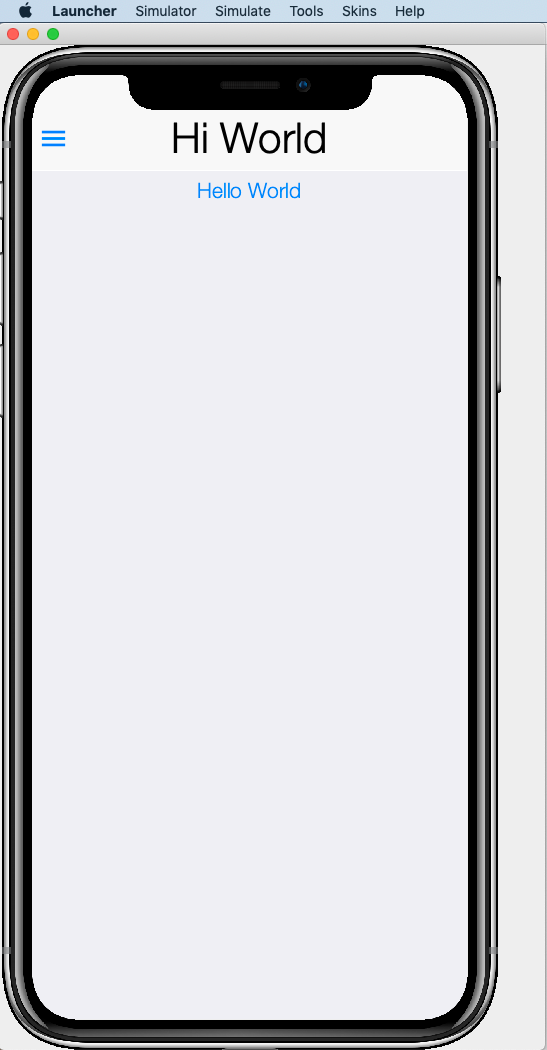
The simulator makes it easy to iteratively develop and debug your app without having to build and deploy to a real device. It includes a number of useful features aimed at stream-lining the development process. Generally I will work exclusively in the simulator until I have a near finished product that I want to share with my beta-testers.
For more information about the Codename One simulator, see this page in the Codename One website.
Project Structure
This project is a multi-module Maven project with the following modules:
- common
-
A Codename One application. All of your cross-platform application code goes in this module.
- android
-
Module containing native Android code such as native interface implementations.
- ios
-
Module containing native iOS code, such as native interface implementations.
- javase
-
Module containing native JavaSE code, such as native interface implementations.
- javascript
-
Module containing native javascript code for the Javascript port.
- win
-
Module containing native Windows UWP code for the UWP windows port.
- cn1libs
-
Module where legacy cn1libs will be installed the
cn1:install-cn1libgoal.
Project Files
A birds-eye View
CLI
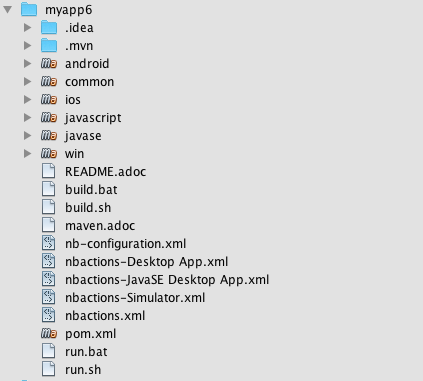
If you list the files in the project directory, you’ll see something like:
drwxr-xr-x  26 shannah  staff   832 Feb 24 08:31 .
drwxr-xr-x  58 shannah  staff  1856 Feb 23 08:01 ..
drwxr-xr-x  13 shannah  staff   416 Feb 26 05:45 .git
-rw-r--r--   1 shannah  staff     6 Feb 23 13:02 .gitignore
drwxr-xr-x  10 shannah  staff   320 Feb 25 11:02 .idea
drwxr-xr-x   3 shannah  staff    96 Feb 23 06:35 .mvn
-rw-r--r--   1 shannah  staff  2570 Feb 23 06:35 README.adoc
drwxr-xr-x   4 shannah  staff   128 Feb 23 06:35 android
-rw-r--r--   1 shannah  staff  2975 Feb 23 06:35 build.bat
-rw-r--r--   1 shannah  staff  3311 Feb 23 06:35 build.sh
drwxr-xr-x  10 shannah  staff   320 Feb 25 06:38 common
drwxr-xr-x   9 shannah  staff   288 Feb 26 05:48 docs
-rw-r--r--   1 shannah  staff   106 Feb 23 07:18 generate-app-project.rpf
drwxr-xr-x   5 shannah  staff   160 Feb 25 09:28 ios
drwxr-xr-x   4 shannah  staff   128 Feb 23 06:35 javascript
drwxr-xr-x   6 shannah  staff   192 Feb 23 06:48 javase
-rw-r--r--   1 shannah  staff  6926 Feb 23 06:35 maven.adoc
-rw-r--r--   1 shannah  staff  3621 Feb 23 06:35 nb-configuration.xml
-rw-r--r--   1 shannah  staff   312 Feb 23 06:35 nbactions-Desktop App.xml
-rw-r--r--   1 shannah  staff   312 Feb 23 06:35 nbactions-JavaSE Desktop App.xml
-rw-r--r--   1 shannah  staff   889 Feb 23 06:35 nbactions-Simulator.xml
-rw-r--r--   1 shannah  staff  4683 Feb 23 06:35 nbactions.xml
-rw-r--r--   1 shannah  staff  5054 Feb 23 06:35 pom.xml
-rw-r--r--   1 shannah  staff   502 Feb 23 06:35 run.bat
-rw-r--r--   1 shannah  staff   550 Feb 23 06:35 run.sh
drwxr-xr-x   4 shannah  staff   128 Feb 23 06:35 win
IntelliJ
When you open the project in IntelliJ IDEA, the project inspector will look like the this.

NetBeans
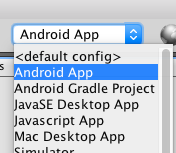
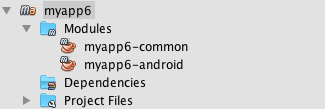
When you open the project in NetBeans, the project inspector will look something like this:
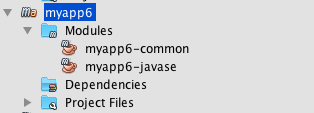
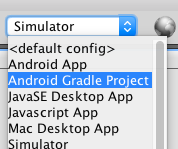
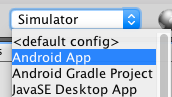
It only lists the "common" and "javase" modules because, with the default configuration, these are the only modules that are "active". If you click on the configuration menu on the toolbar and select "Android App", as shown below, it will show the "android" module instead of the "javase" module.
You can see all of the fiiles in the project by changing the view to the "File Inspector" as shown below:
|
Tip
|
You’ll almost always be working with the "common" submodule. This module contains all of your cross-platform Kotlin (and Java) code, your CSS files, your GUI builder files, and your settings. For this reason, you’ll probably want to open this module also, by right-clicking it and selecting "Open Project" (The menu option will say "Open Project of Folder" if you do this from the File Inspector instead of the Project Inspector).: 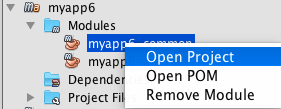
With both the root and the common projects opened, your project inspector will now look something like: 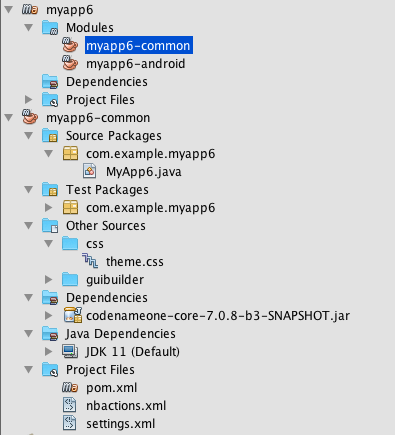
|
|
Important
|
All of the Codename One build options are defined ONLY on the root module. If you are editing a file inside the common module, you will need to select the root project in the project inspector to perform a build, or to run the project. This is an annoyance that we are working on improving with the NetBeans integration. |
Eclipse
When you open the project in Eclipse, the package explorer will look something like this:
|
Important
|
All run and build options should be run with the root project seleted in the package explorer. If you try to build or run the project with one of the sub-modules (e.g. xxx-common, or xxx-javase selected, then the build/run will fail with an error). |
File Descriptions
Wondering what all of these files are? Here is a brief overview:
- build.bat/build.sh
-
A thin CLI wrapper script for building the app for the various build targets from the Command-line. Use
build.baton Windows andbuild.shon Linux and Ma. - run.bat/run.sh
-
A thin CLI wrapper script for running the project inside the Codename one simulator from the command-line. It can also be used to open the Codename One Settings app. Use
run.baton Windows orrun.shon Linux/Mac. - nbactions.xml, nbactions-*.xml, nb-configuration.xml
-
Configuration files for NetBeans that add some convenient menu options for running and building the project.
- *.adoc
-
README files and some documentation to help you get started.
Editing Kotlin Code
|
Tip
|
In this section we jump right into the code without explaining what APIs are available. See API for an overview of the supported APIs. |
In order to demonstrate how to make this project your own, let’s begin by making a button that actually does something.
Open your project’s "main" class for editing. Your main class name and path will depend on the values you chose for mainName and packageName in the Generating new project step.
If you chose "com.example" as your packageName and "MyApp" as your mainName
then your main class will be located at common/src/main/kotlin/com/example/MyApp.kt.
The contents of this file will look something like:
package com.example.myapp

// import statements

/**
 * This file was generated by [Codename One initializr](https://start.codenameone.com/) for the purpose
 * of building native mobile applications using Java and Kotlin.
 */
open class MyApp : Lifecycle() {
    override fun runApp() {
        val hi = Form("Hi World", BoxLayout.y())
        val helloButton = Button("Hello World")
        hi.add(helloButton)
        helloButton.addActionListener { e: ActionEvent? -> hello() }
        hi.toolbar.addMaterialCommandToSideMenu("Hello Command",
                FontImage.MATERIAL_CHECK, 4f) { e: ActionEvent? -> hello() }
        hi.show()
    }

    private fun hello() {
        Dialog.show("Hello Codename One", "Welcome to Codename One", "OK", null)
    }
}
This class extends the "Lifecycle" class which implements key methods for your app’s lifecycle. The runApp()` method is the entry point for your app.
|
Tip
|
For more fine-grained handling of lifecycle events in your app, you can override the following methods of the
|
Let’s go through the runApp() method line by line to see what’s going on:
val hi = Form("Hi World", BoxLayout.y()) (1)
val helloButton = Button("Hello World") (2)
hi.add(helloButton) (3)
helloButton.addActionListener { e: ActionEvent? -> hello() } (4)
hi.toolbar.addMaterialCommandToSideMenu("Hello Command",
        FontImage.MATERIAL_CHECK, 4f) { e: ActionEvent? -> hello() } (5)
hi.show() (6)-
Creates a new form. The Form is the top-level UI component. All UI components that are displayed on the screen will be contained inside a Form.
-
We create a Button with the label "Hello World".
-
We add the Button to the form.
-
We attach an "action" listener to call the
hello()method when it is clicked. -
We add a comment to the side menu which also calls the
hello()method when it is clicked. -
We show the form.
|
Tip
|
See Codename One Javadocs for information about available classes and methods. You can also find a large selection of tutorials in the How Do I section of the website. |
Editing CSS Stylesheet
The CSS stylesheet for the app allows you to customize many aspects of the look and feel of the app. By default the app uses a native theme, which means that the UI will look like a Native Android App when running on Android, and it will look like a native iOS app when running on iOS. You can override the styles in the stylesheet, which is located at:
common/src/main/css/theme.css
Open this file, and you’ll see some default CSS rules like the snippet below:
/** Define Theme Constants here */
#Constants {
    includeNativeBool: true;
}

/** Style for Button class */
Button {
    font-family: "native:MainLight";
    font-size: 3mm;
}

/** Style for App Title Bar Text */
Title {
    font-family: "native:MainLight";
    font-size: 6mm;
}

/** Style for Dialog body */
DialogBody {
    font-family: "native:MainLight";
    font-size: 2.8mm;
}

/** Style for Dialog title bar text */
DialogTitle {
    font-family: "native:MainLight";
    font-size: 4.5mm;
}

/** Style for the side menu */
SideNavigationPanel {
    background: white;
    padding: 2mm 1mm 1mm 1mm;
}

@media platform-ios {
    /** iOS Only styles for side menu. */
    SideNavigationPanel {
        /** Extra top padding to deal with notch on iPhoneX */
        padding: 6mm 1mm 1mm 1mm;
    }
}

/** Style for commands in side menu. */
SideCommand {
    padding: 1mm;
    border: none;
    text-decoration: none;
    color: black;
    font-family: "native:MainLight";
    font-size: 4mm;
    border-bottom: 2px solid #cccccc;
}
To demonstrate the use of CSS, let’s add a border to all of the buttons in our app.
Open the theme.css file and add the following snippet:
Button {
    border: 1px solid gray;
    border-radius: 2mm;
}
Now save the CSS file and run the project in the simulator (as described in Running the Project in the Codename One Simulator).
When the app is finished loading, you should see a corresponding border around our button as shown below:

Now let’s make a small change to the theme.css file without closing the simulator as a way to demonstrate the live-refresh feature of the simulator.
Let’s change the border color to blue:
Button {
    border: 1px solid blue;
    border-radius: 2mm;
}
And save the file. After a second, or so, you should see this change reflected in the simulator as shown below:

|
Tip
|
For a more more information about Codename One’s CSS support, and which directives are supported see the Codename One Developer guide. |
Building the Project
This project includes build goals for a variety of different target platforms. The following target platforms are supported:
-
Mac Desktop app
-
Windows Desktop app
-
Windows UWP app
-
Javascript app
For most of the build targets you have two choices for how you build your project:
-
Build Locally. You build the project directly on your local machine. In some cases, this will require you to install additional development tools, and will only work on certain types of environment. E.g. To build for iOS locally, you must be building the project on a Mac with Xcode installed.
-
Using the Codename One Build Server. Your project is compiled locally to .class files, and then sent to the Codename One build server to generate the native bundles. This process is seamless, and does not require you to have any special development tools installed on your machine because the build server has all of the toolchains installed. For more information about Codename One’s build server and toolchain see Build Tools.
Building JavaSE Desktop App
The "default" build target for this project is as a JavaSE desktop app. This is basically an executable Jar that can be distributed and run on any computer with a Java Runtime Environment (JavaSE 8 or higher).
|
Note
|
JavaSE desktop builds are built locally, and do not require any special development tools to be installed, beyond the JDK. |
CLI
Use the "build.sh" (build.bat on Windows) script to build this target from the command line:
./build.sh|
Tip
|
The build.sh script is just a thin wrapper around |
If all goes well, you will find the resulting executable jar in the javase/target directory.
IntelliJ
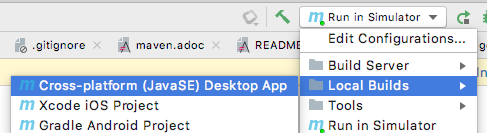
Click on the configuration menu and select "Local Builds" > "Cross-platform JavaSE Desktop App" as shown below:
Then press the "run" ![]() button.
button.
If all goes well, you will find the resulting executable jar in the javase/target directory.
NetBeans
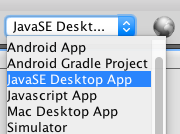
Click on the "Configuration" Menu on the toolbar, and select "JavaSE App" from the options as shown below:
Then press the "build" ![]() button.
button.
If all goes well, you will find the resulting executable jar in the javase/target directory.
Eclipse
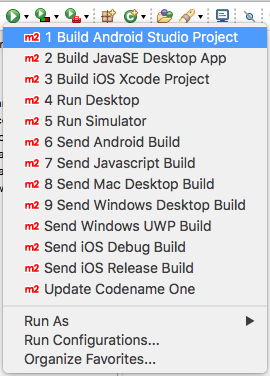
Click on the button on the toolbar, and select "Build JavaSE Desktop App" from the options as shown below:
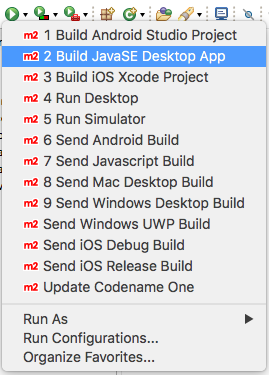
|
Important
|
Make sure the root module is selected in the package explorer, and not one of the sub-modules, or the build will fail. |
If all goes well, you will find the resulting executable jar in the javase/target directory.
Building for iOS
The recommended approach is to use the build server as it doesn’t require you to install any special development tools on your computer beyond the standard JDK.
Building Locally
Building your app for iOS locally involves two steps:
-
Open the generated project in Xcode, and build it.
Generating an Xcode Project
Prerequisites
In order to generate an Xcode Project, you must be using a Mac with Xcode installed. At the time of writing we recommend Xcode 11 or higher. In addition you will also need to install Cocoapods and xcodeproj.
|
Tip
|
If you use one of the Codename One build server targets, you can avoid these requirements (i.e. you won’t need a Mac, nor Xtools installed). |
Command-line
Use the build.sh or build.bat script in the project’s root directory as follows:
./build.sh xcodeOutput location: ios/target
If all went well you can proceed to open the Xcode project (the .xcworkspace file) in Xcode, and build the project.
IntelliJ IDEA
Click on the "Configuration" menu in the upper right toolbar, and select "Local Builds" > "Xcode iOS Project" as shown below:

Press the "run" (![]() ) button to build the project.
) button to build the project.
If all goes well, the project will be found in the ios/target directory.
You can proceed to open the Xcode project (the .xcworkspace file) in Xcode, and build the project.
NetBeans
Press on the configuration menu on the toolbar and select "iOS Xcode Project" as shown below:
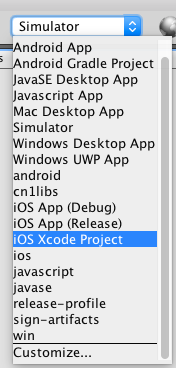
Then press the "run" (![]() ) button.
) button.
If all goes well, the project will be found in the ios/target directory.
You can proceed to open the Xcode project (the .xcworkspace file) in Xcode, and build the project.
Eclipse
Press on the menu on the toolbar and select "Build iOS Xcode Project" as shown below:
|
Important
|
Make sure the root module is selected in the package explorer, and not one of the sub-modules, or the build will fail. |
If all goes well, the project will be found in the ios/target directory.
You can proceed to open the Xcode project (the .xcworkspace file) in Xcode, and build the project.
Using the Codename One Build Server
There are two build targets for iOS builds that use the build server:
- iOS Debug Build
-
Use this goal to build an app that you can distribute internally for testing and debugging.
- iOS Release Build
-
Use this goal to build a bundle that you can submit to the iOS App store.
Before you can submit an iOS build to the build server, you need to jump through a few of Apple’s hoops. See iOS Prerequisites for more information about these steps.
Building iOS Debug Build
Command-line
Use the build.sh or build.bat script (depending on whether you’re using Windows or Linux/Mac) to submit an iOS debug build to the build server.
./build.sh iosbuild.bat ios|
Tip
|
The build.sh (build.bat) script is just a thin wrapper around the "mvn" command. You can alternatively run this goal in Maven directly with the command: |
IntelliJ IDEA
Click on the configuration menu in the upper right toolbar, and select "Build Server" > "iOS Debug Build" as shown below.
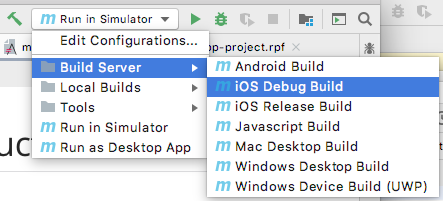
Then press the "run" (![]() ) button.
) button.
NetBeans
Click on the Configuration menu on the tool bar and select "iOS App (Debug)" as shown below:
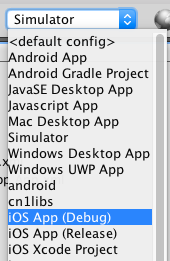
Then press the "Run" ![]() button.
button.
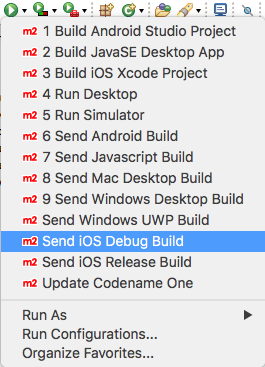
Eclipse
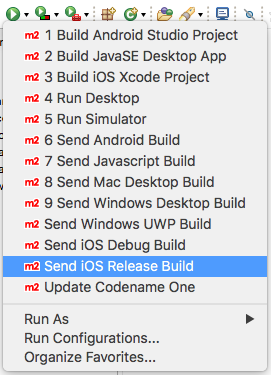
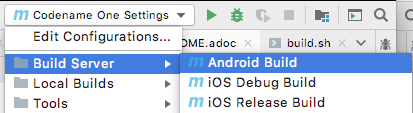
Click on the menu on the tool bar and select "Send iOS Debug Build" as shown below:
|
Important
|
Make sure the root module is selected in the package explorer, and not one of the sub-modules, or the build will fail. |
Downloading Result from the Build Server
After you submit the build, you can follow the progress on the Codename One build server. See Using the Codename One Build App.
Building iOS Release Build
Command-line
Use the build.sh or build.bat script (depending on whether you’re using Windows or Linux/Mac) to submit an iOS release build to the build server.
./build.sh ios-releasebuild.bat ios-release|
Tip
|
The build.sh (build.bat) script is just a thin wrapper around the "mvn" command. You can alternatively run this goal in Maven directly with the command: |
IntelliJ IDEA
Click on the configuration menu in the upper right toolbar, and select "Build Server" > "iOS Release Build" as shown below.
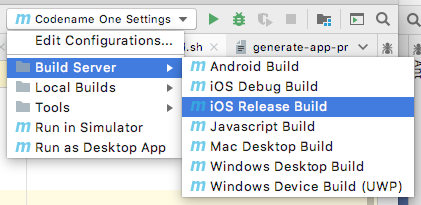
Then press the "run" (![]() ) button.
) button.
NetBeans
Click on the Configuration menu on the toolbar and select "iOS App (Release)" as shown below:
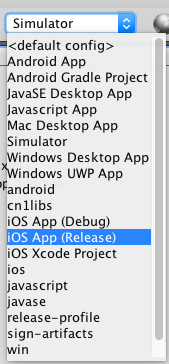
The press the "Run" ![]() button.
button.
Eclipse
Click on the menu on the toolbar and select "Send iOS Release Build" as shown below:
|
Important
|
Make sure the root module is selected in the package explorer, and not one of the sub-modules, or the build will fail. |
Downloading Result from the Build Server
After you submit the build, you can follow the progress on the Codename One build server. See Using the Codename One Build App.
Building for Android
Building Locally
Building your app for Android locally involves two steps:
-
Generate an Android Studio Project
-
Open the generated project in Android Studio, and build it.
Prerequisites
Building an Android app locally requires that you have Android developer tools and gradle installed. You can download the latest Android Development tools from here.
|
Tip
|
If you use the "Android App" build target, which uses the Codename One build server, you don’t need to have any special development tools installed because the Android-specific portion of the build is handled on the build server, which has the full toolchain already installed. See Using the Codename One Build Server. |
Generating an Android Studio Project
Command-line
Use the build.sh or build.bat script in the project’s root directory as follows:
./build.sh android_sourcebuild.bat android_sourceOutput location: android/target
If all went well you can proceed to open the Android Studio project and build the project.
IntelliJ IDEA
Click on the "Configuration" menu in the upper right toolbar, and select "Local Builds" > "Android Gradle Project" as shown below:
Press the "run" (![]() ) button to build the project.
) button to build the project.
If all goes well, the project will be found in the android/target directory.
You can proceed to open and build the project in Android Studio.
NetBeans
Press on the configuration menu on the toolbar and select "Android Gradle Project" as shown below:
Then press the "run" (![]() ) button.
) button.
If all goes well, the project will be found in the android/target directory.
You can proceed to open and build the project in Android Studio.
Eclipse
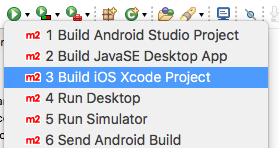
Press on the menu on the toolbar and select "Build Android Studio Project" as shown below:
|
Important
|
Make sure that the root module is selected in the package explorer when you select this option, and not one of the sub-modules, or the build will fail with an error. |
If all goes well, the project will be found in the android/target directory.
You can proceed to open and build the project in Android Studio.
Using the Codename One Build Server
The Codename One build server will generate an Android app (.apk and .aab) that you can install directly onto your Android device for debugging, or that you can submit to the Google play store. Unlike the local build option, it doesn’t require you to install any development tools on your computer beyond the basic JDK install. Android builds are available with a free Codename One account, which you can create at https://cloud.codenameone.com.
Command-line
Use the build.sh or build.bat script (depending on whether you’re using Windows or Linux/Mac) to submit an Android build to the build server.
./build.sh androidbuild.bat android|
Tip
|
The build.sh (build.bat) script is just a thin wrapper around the "mvn" command. You can alternatively run this goal in Maven directly with the command: |
IntelliJ IDEA
Click on the configuration menu in the upper right toolbar, and select "Build Server" > "iOS Debug Build" as shown below.
Then press the "run" (![]() ) button.
) button.
NetBeans
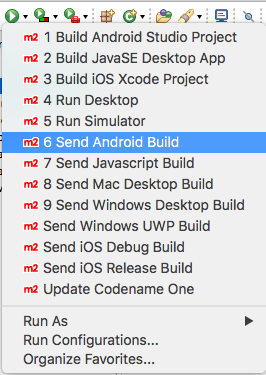
Click on the configuration menu on the tool bar and select "Android App" as shown below:
Then press the "run" ![]() button.
button.
Eclipse
Click on the button on the toolbar and select "Send Android Build" as shown below:
|
Important
|
Make sure that the root module is selected in the package explorer when you select this option, and not one of the sub-modules, or the build will fail with an error. |
Downloading Result from the Build Server
After you submit the build, you can follow the progress on the Codename One build server. See Using the Codename One Build App.
Mac Desktop Builds
|
Note
|
The Mac Desktop build target uses the Codename One build server, and requires a Codename One Pro-level subscription or higher. See the Codename One website to sign up for your free 30 day trial. |
The Mac Desktop build target will generate a native Mac app bundle (.app). The output will be either a .dmg file or a .pkg file depending on the settings that you choose inside Codename One Settings.
|
Tip
|
This tutorial only shows you how to trigger a Mac desktop build. More details about Mac desktop builds, including instructions for deploying to the Mac App Store see Working with Mac OS X in the Codename One developer guide. |
CLI
Use the build.sh (or build.bat on Windows) script to initiate a Mac desktop build:
./build.sh mac_desktop|
Tip
|
The build.sh (build.bat) script is just a thin wrapper around the "mvn" command. You can alternatively run this goal in Maven directly with the command: |
After you submit the build, you can follow the progress on the Codename One build server. See Using the Codename One Build App.
IntelliJ
Click on the "Configuration" menu in the upper right, and select "Build Server" > "Mac Desktop Build" as shown below:
After you submit the build, you can follow the progress on the Codename One build server. See Using the Codename One Build App.
NetBeans
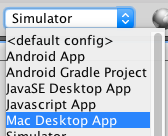
Click on the configuration menu on the tool bar and select "Mac Desktop App" as shown below:
Then press the "run" ![]() button.
button.
After you submit the build, you can follow the progress on the Codename One build server. See Using the Codename One Build App.
Eclipse
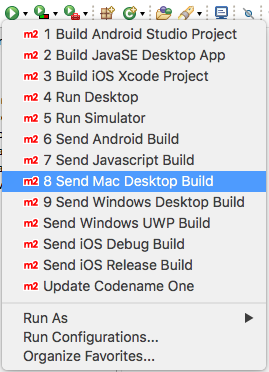
Click on the button on the tool bar and select "Send Mac Desktop Build" as shown below:
|
Important
|
All run and build options should be run with the root project seleted in the package explorer. If you try to build or run the project with one of the sub-modules (e.g. xxx-common, or xxx-javase selected, then the build/run will fail with an error). |
After you submit the build, you can follow the progress on the Codename One build server. See Using the Codename One Build App.
Windows Desktop Builds
|
Note
|
The Windows Desktop build target uses the Codename One build server, and requires a Codename One Pro-level subscription or higher. See the Codename One website to sign up for your free 30 day trial. |
The Windows Desktop build target will generate a native Windows application (.exe).
CLI
Use the build.sh (or build.bat on Windows) script in the project directory to initiate a Windows Desktop build as follows:
./build.sh windows_desktop|
Tip
|
The build.sh (build.bat) script is just a thin wrapper around the "mvn" command. You can alternatively run this goal in Maven directly with the command: |
After you submit the build, you can follow the progress on the Codename One build server. See Using the Codename One Build App.
IntelliJ
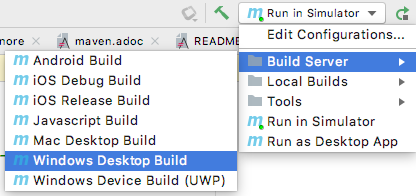
Click on the "Configuration" menu in the upper right of the toolbar, and select "Build Server" > "Windows Desktop Build" as shown below:
Then press the "run" ![]() button.
button.
After you submit the build, you can follow the progress on the Codename One build server. See Using the Codename One Build App.
NetBeans
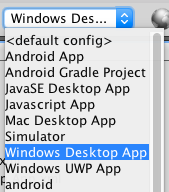
Click on the configuration menu on the tool bar and select "Windows Desktop App" as shown below:
Then press the "run" ![]() button.
button.
After you submit the build, you can follow the progress on the Codename One build server. See Using the Codename One Build App.
Eclipse
Click on the button on the toolbar and select "Send Windows Desktop Build" as shown below:
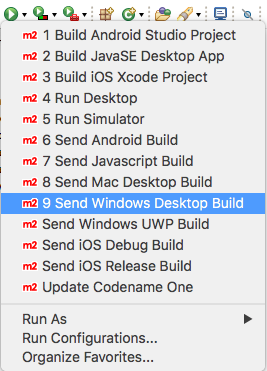
After you submit the build, you can follow the progress on the Codename One build server. See Using the Codename One Build App.
Windows UWP Builds
|
Note
|
Windows UWP Builds use the Codename One build server, and are available with a free Codename One account. You can sign up here. |
The Windows UWP build target will produce an application that can be installed on all windows 10 devices (phones, tablets, laptops, and desktops), and can be distributed via the Windows app store. Since this build target uses the Codename One build server, it doesn’t require any special software to be installed on your build machine beyond the standard JDK.
|
Important
|
Before you can submit a UWP build you need to create a certificate, and at least enter some placeholder information in the "UWP Settings" section of Codename One settings. See Working with UWP in the Codename One developer guide. |
Submitting a UWP Build
CLI
Use the build.sh (build.bat on Windows) script in the project’s directory to submit a UWP build.
./build.sh windows_devicebuild.bat windows_device|
Tip
|
The |
After you submit the build, you can follow the progress on the Codename One build server. See Using the Codename One Build App.
IntelliJ
Click on the configuration menu in the upper right of the toolbar, and select "Build Server" > "Windows Device Build (UWP)" as shown below.
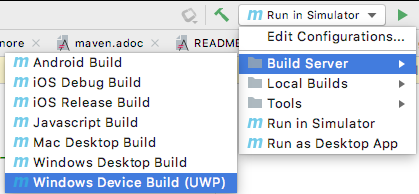
The press the "run" ![]() button.
button.
After you submit the build, you can follow the progress on the Codename One build server. See Using the Codename One Build App.
NetBeans
Click on the configuration menu on the tool bar and select "Windows UWP App" as shown below:

Then press the "run" ![]() button.
button.
After you submit the build, you can follow the progress on the Codename One build server. See Using the Codename One Build App.
Eclipse
Click on the button on the toolbar and select "Send Windows UWP Build" as shown below:
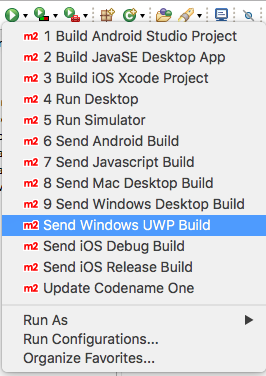
After you submit the build, you can follow the progress on the Codename One build server. See Using the Codename One Build App.
Advanced UWP Options
For more information about UWP builds see Working with UWP in the Developer guide.
Javascript Builds
The Javascript build target will generate a pure HTML/Javascript web app that will run in any modern web browser, without requiring any extensions (i.e. Real web app - NOT an applet). It does this with the help of the fanstatic TeaVM compiler which compiles JVM .class files into highly performant and compact native Javascript.
|
Note
|
Javascript builds are available to Codename One Enterprise subscribers. See the Codename One website for pricing information. |
Submitting a Javascript Build
CLI
Use the build.sh (build.bat on Windows) script in the project’s directory to submit a UWP build.
./build.sh javascriptbuild.bat javascript|
Tip
|
The |
After you submit the build, you can follow the progress on the Codename One build server. See Using the Codename One Build App.
IntelliJ
Click on the configuration menu in the upper right of the toolbar, and select "Build Server" > "Javascript Build" as shown below.
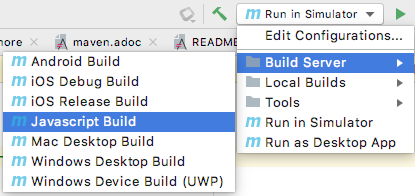
The press the "run" ![]() button.
button.
After you submit the build, you can follow the progress on the Codename One build server. See Using the Codename One Build App.
NetBeans
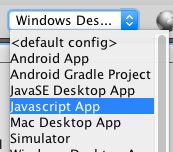
Click on the configuration menu on the tool bar and select "Javascript App" as shown below:
Then press the "run" ![]() button.
button.
After you submit the build, you can follow the progress on the Codename One build server. See Using the Codename One Build App.
Eclipse
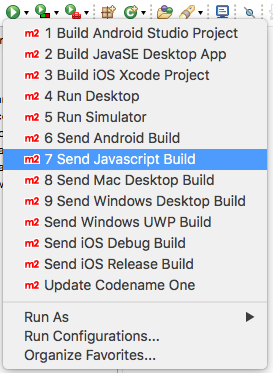
Click on the button on the tool bar and select "Send Javascript Build" as shown below:
After you submit the build, you can follow the progress on the Codename One build server. See Using the Codename One Build App.
Advanced Javascript Options
For more information about Javascript builds see Working with Javascript in the Developer guide.
Appendix A: Codename One Settings
The Codename One Settings app (aka Codename One Preferences, aka Control Center) allows you to configure many aspects of your application. This is where you can generate certificates, browse/install add-ons, monitor the status of your cloud builds, configure build hints, and more.
Opening Codename One Settings
Opening Codename One Settings from Command-line
Use the run.sh (or run.bat, if on Windows) to open Codename One settings:
./run.sh settingsOpening Codename One Settings from IntelliJ
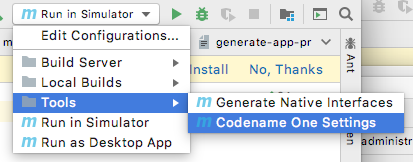
Click on the "Configuration" menu in the upper right of the toolbar, and select "Tools" > "Codename One Settings" as shown below.
Opening Codename One Settings from NetBeans
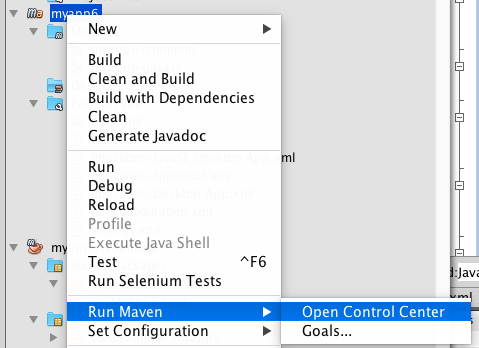
Right-click on the project in the project inspector, and select "Maven" > "Open Control Center" as shown below:
Opening Codename One Settings from Eclipse
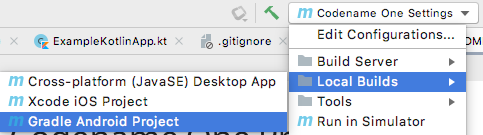
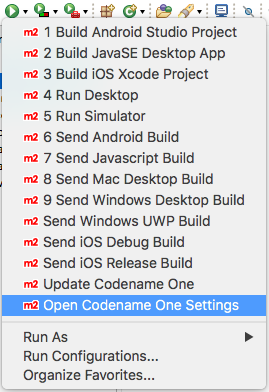
Press the button and select "Open Codename One Settings" as shown below:
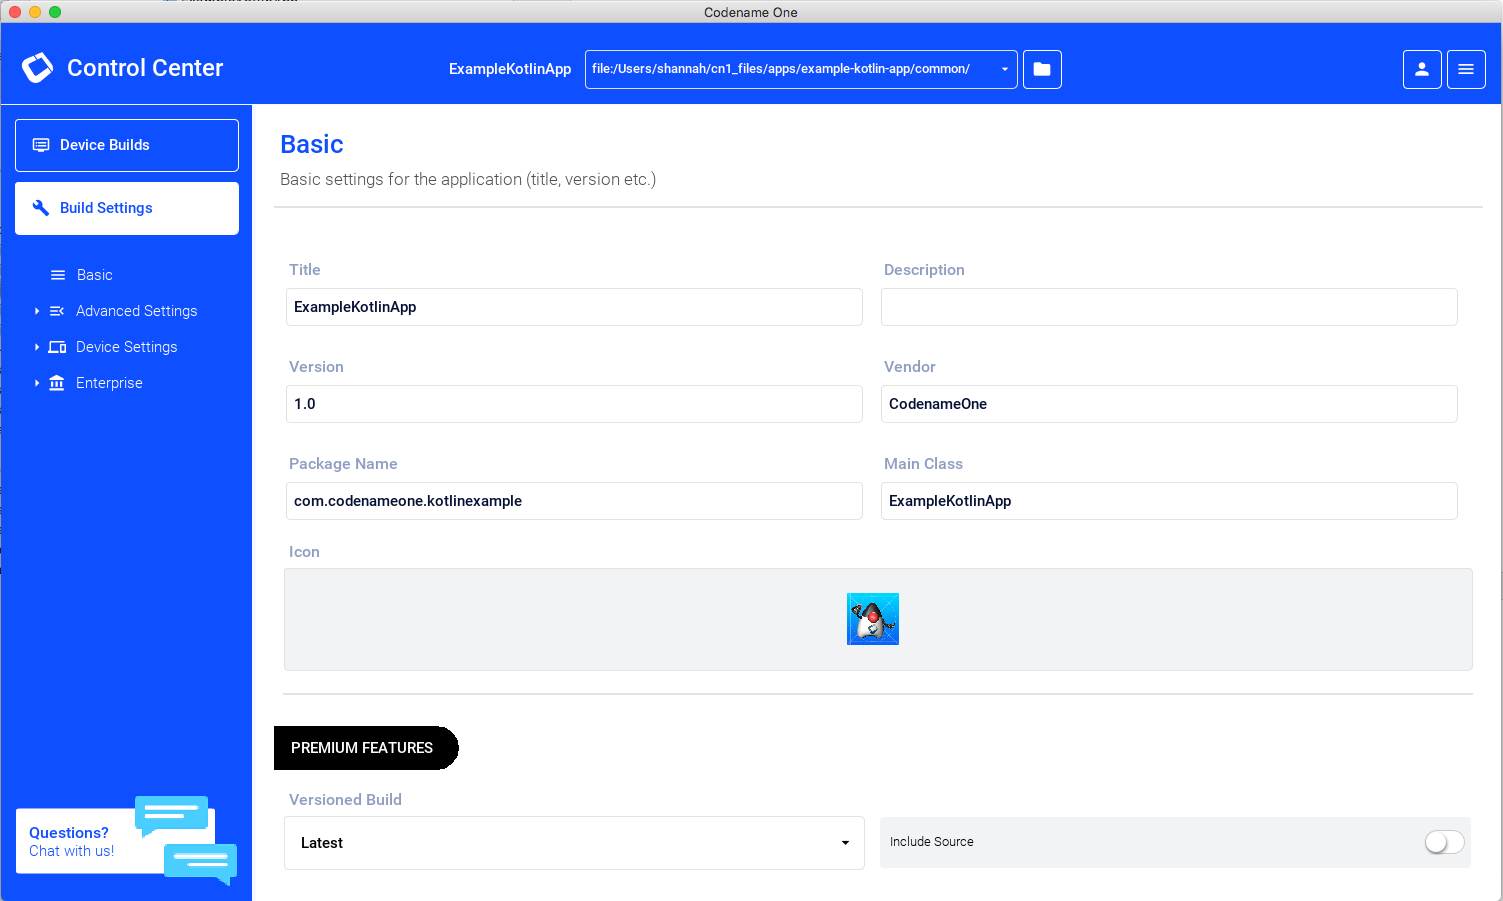
The Dashboard
Once inside Codename One Settings, you’ll see a dashboard like the following:
Appendix B: iOS Prerequisites
Before you can build your app for iOS you need to do a little bit of set-up to satisfy Apple. This includes activities such as creating an App ID, certificates, and provisioning profiles. The process can be dull and time-consuming, but luckily Codename One provides a certificate wizard to help you through the process.
|
Important
|
You must have an Apple Developer account in order to generate certificates and profiles. You can sign up for an account at https://developer.apple.com/. |
Generating Certificates
The certificate wizard will allow you to easily generate the certificates and provisioning profiles required to build your app for iOS. You can access the certificate wizard through Codename One settings. See Codename One Settings for instructions on opening the Codename One Settings console.
Using the Certificate Wizard
Starting from the Codename One Settings dashboard.
In the left navigation menu, click on "Device Settings" > "iOS" > "Certificate Wizard".
You should then be prompted to login on a form as shown below:
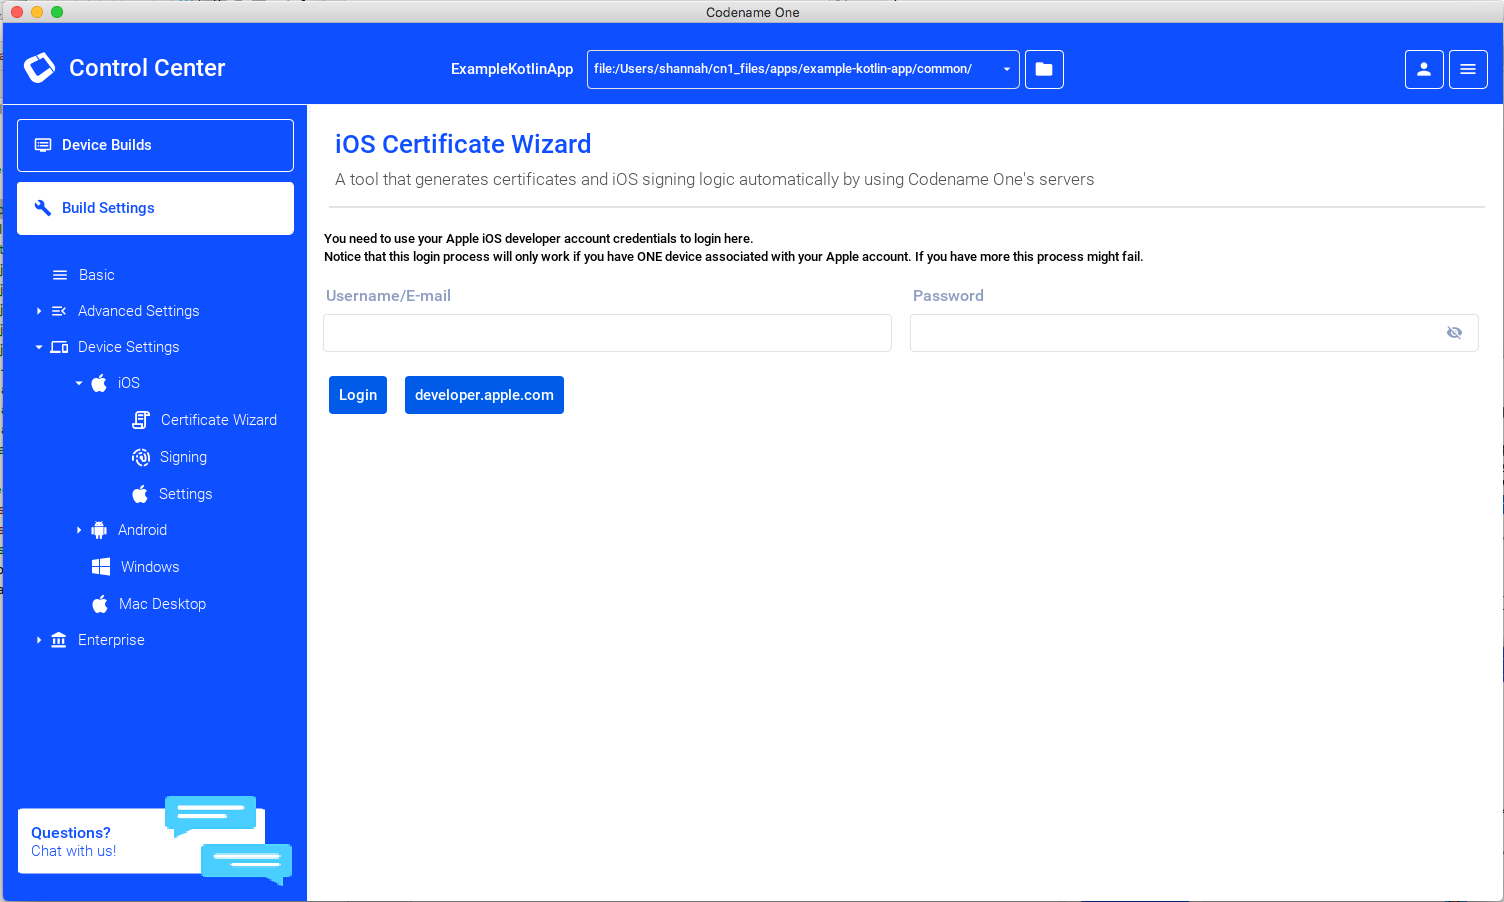
Login using your Apple Developer login credentials.
|
Important
|
You need to log in with your Apple Developer account, and not your Codename One account. This is required by the certificate wizard to be able to generate your provisioning profiles and certificates on your Apple developer account. |
|
Note
|
The login process may take a while. Be patient. It is typical for the login to take 30 seconds or more. |
Once logged in, you’ll be shown a form with all of your existing registered devices. These are the devices that will be able to install your debug builds. If you don’t see your device listed there yet, click on the "Manage Devices" button and follow the prompts to add your devices to the list.
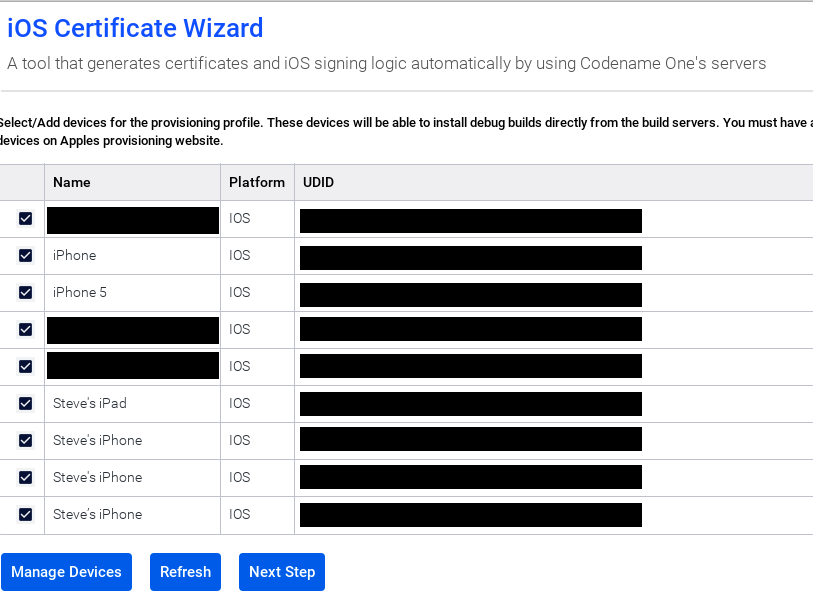
Once you have all of your devices included here, click on the "Next Step" button at the bottom of the form.
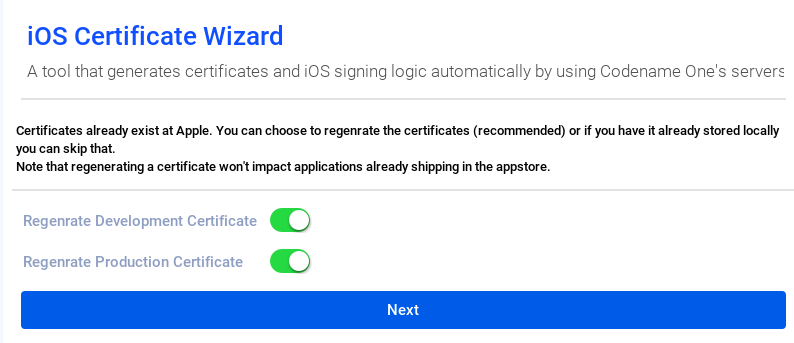
The flow of the wizard may vary a little bit depending on the state of your developer account. E.g. If you already have some certificates listed in Apple, then you will be prompted to rengenerate them:
|
Note
|
Yes, I see the "typo" in the word "Regenrate". Screenshots are just a pain to regenrate after fixing bugs. |
If you already have your certificates, and know where they are located, then you don’t need to "regenerate" them. You can unselect these options. If you aren’t sure where they are, or if they are valid anymore, you can just select these boxes and the Certificate wizard will revoke your old certificates and generate new ones for you.
Click "Next" after making your choice.
On the next form you’ll be prompted whether to generate Push certificates. For now, we’ll leave this unchecked. For a birds-eye view of push support, see https://www.codenameone.com/blog/push-cheatsheet.html.
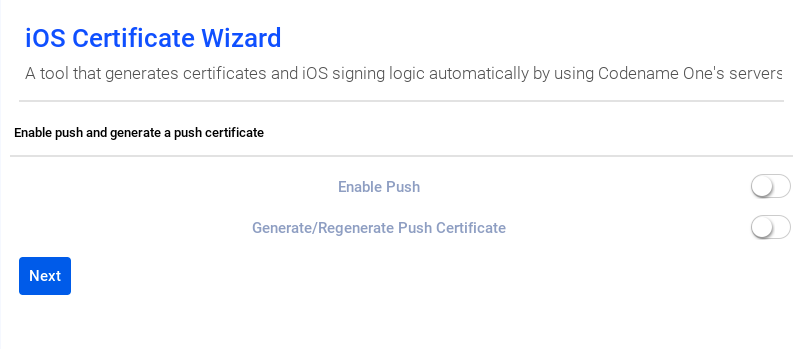
Click "Next"
After a little while (usually about 1 minute), if everything went OK, you should be greated with a "Success" message like the following:
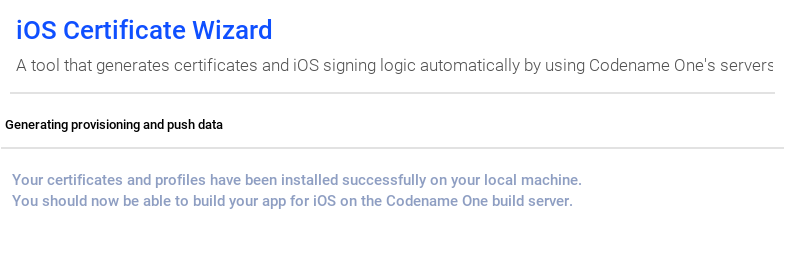
You’ll notice that your project now contains a folder (inside the "common" module) named "iosCerts" that includes the following files:
- appstore_certificate.p12
-
This is the certificate used to sign production iOS builds. The ones you submit to the app store.
- development_certificate.p12
-
This is the certificate used to sign development (debug) iOS builds.
- development_provisioning_profile.mobileprovision
-
This is the provisioning profile used for your development builds. This includes information such as which development devices you can install your app onto, and what entitlements your app has. If you change some of the features of your app (e.g. add push support, or add development devices), then you’ll need to regenerate the provisioning profile. Such changes would not require you to regenerate the certificates.
- production_provisioning_profile.mobileprovision
-
This is the provionsing profile used for your production iOS builds.
Appendix C: Using the Codename One Build App
After you submit a build to the Codename One build server, you are asked to follow the build progress at https://cloud.codenameone.com
When you log in, you should see a list of your recent builds as follows:
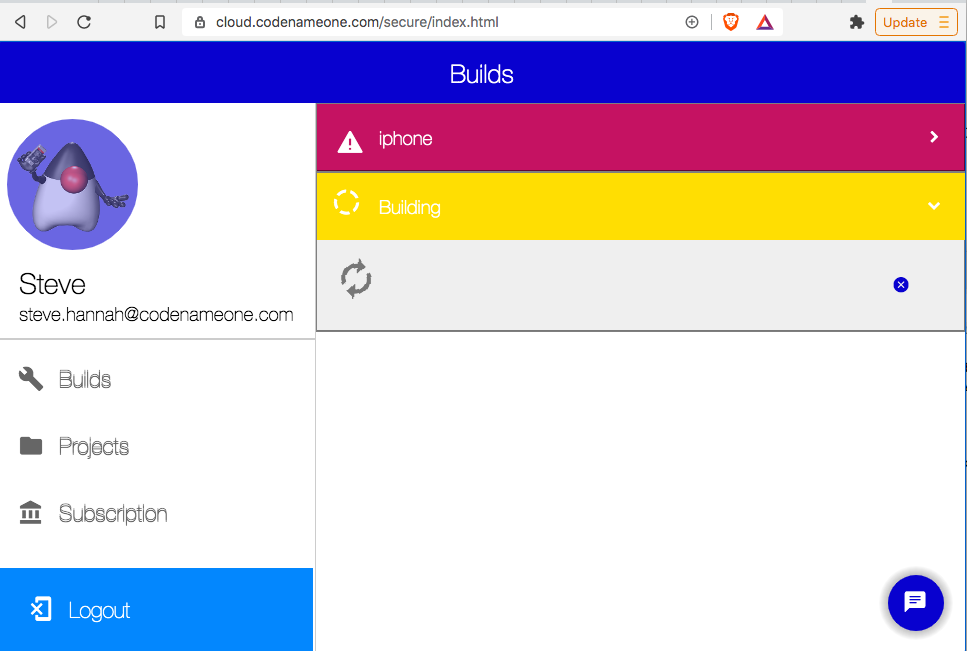
The length of time required to perform a build will vary depending on the size of the project and the platform target. Typically Javascript builds complete in under a minute and Android in under two minutes. iOS builds take the longest because of the extra work involved in compiling a native binary. Typically iOS builds will take 5 or 6 minutes.
When a build is complete, you’ll see a set of links for you to download various aspects of the build.
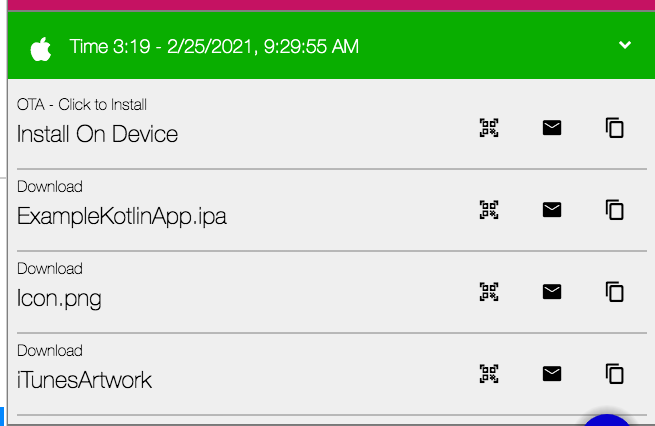
There are options to email the links to yourself (which you can forward on to your testers), show a QR code (which will allow you to easily install the app on your device), and a direct link to download the app directly.
Appendix D: API
|
Note
|
This section is not a comprehensive treatment of the Codename One API. For a more in-depth discussion of Codename One and it’s supported APIs, refer to the Developer Guide. |
Codename One apps support a subset of the JavaSE 8 API as well as its own light-weight runtime and UI component library that includes support for everything that would expect in a mobile application platform.
See the JavaDocs for a full list of supported classes, and check out the source in the git repository.
|
Note
|
The Codename One source is open source. Released under GPLv2 with Classpath Exception. |
Codename One is much more than just an API library. It provides a full tool-chain and eco-system for developing beautiful, performant native mobile apps with a single codebase in Java and Kotlin. Please see the introduction in the Developer guide for a proper overview of Codename One.
Limitations
- No reflection
-
Codename One apps do not support reflection because reflection makes it impossible to keep app-size down.
Kotlin API Support
Codename One apps support the [Kotlin Standard Library](https://kotlinlang.org/api/latest/jvm/stdlib/). Kotlin support is still relatively new, so are still discovering which libraries are compatible. APIs that rely on reflection will not be supported, but most other libraries should work.
Add-on Libraries
Add-on libraries can be added to your library in the common/pom.xml file, however, if you use APIs that are not supported by Codename One (e.g. which use reflection), then your app will fail to build.
Codename One supports its own library format (cn1lib) which sort of "certifies" that it is compatible with Codename One. You can browse the growing catalog of available cn1libs inside Codename One Settings.
For more information about cn1libs, see the cn1libs section of the developer guide.